相关知识点请参考 Vue2从入门到放弃。
概念
对于 Vue3 的相关概念,这里就不做简述了,请自行去阅读 Vue3 官网
初体验
想必已经阅读过 Vue3 官网了,现在我们就来初次使用下 Vue3。
下面使用 CDN 的方式进行引入使用。
1
2
3
4
5
6
7
8
| <div id="app"></div>
<script src="https://unpkg.com/vue@next"></script>
<script>
const app = Vue.createApp({
template: '<h2>hello vue3</h2>'
})
app.mount('#app')
</script>
|
我们可以看到页面中正常显示了 hello vue3。
指令
v-bind
动态绑定属性
在某些情况下,我们的属性名称也不是固定的,我们可以使用:[属性名]='值' 的格式来进行定义,这种方式称为动态绑定属性。
1
2
3
4
5
6
7
8
9
10
11
12
13
14
15
16
17
18
| <div id="app"></div>
<template id="my-app">
<div :[name]="value"></div>
</template>
<script src="https://unpkg.com/vue@next"></script>
<script>
const app = Vue.createApp({
template: '#my-app',
data() {
return {
name: "lqzww",
value: "happy"
}
}
})
app.mount('#app')
</script>
|
我们可以发现编译后变成了:<div lqzww="happy"></div>。
如果我们想要将一个对象的所有属性都绑定到元素上的所有属性,我们可以直接使用 v-bind 来绑定一个对象,例如:
1
2
3
4
5
6
7
8
9
10
11
12
13
14
15
16
17
18
19
20
21
| <div id="app"></div>
<template id="my-app">
<div v-bind="obj"></div>
</template>
<script src="https://unpkg.com/vue@next"></script>
<script>
const app = Vue.createApp({
template: '#my-app',
data() {
return {
obj: {
name: "lqzww",
age: 18,
value: "happy"
}
}
},
})
app.mount('#app')
</script>
|
编译后的结果为:<div name="lqzww" age="18" value="happy"></div>。
v-on
绑定对象
我们可以在一个标签上绑定多个事件,例如:
1
2
3
4
5
6
7
8
9
10
11
12
13
14
15
16
17
18
19
20
| <div id="app"></div>
<template id="my-app">
<div style="width: 100px;height: 100px;border: 1px solid red;" v-on="{click: btnClick,mousemove: mouseMove}"></div>
</template>
<script src="https://unpkg.com/vue@next"></script>
<script>
const app = Vue.createApp({
template: '#my-app',
methods: {
btnClick() {
console.log('btn');
},
mouseMove() {
console.log('mouse');
}
},
})
app.mount('#app')
</script>
|
v-for
key的作用
- key 属性主要用于 Vue 的虚拟 DOM 算法,在新旧 nodes 对比时辨识 VNodes;
- 如果没有 key,Vue 会使用最大限度减少动态元素并且尽可能的尝试就地修改/复用相同类型元素的算法;
- 有 key 时,会基于 key 重新排列元素排序,并且会移除/销毁 key 不存在的元素。
源码位于:packages -> runtime-core -> src -> renderer.ts 文件的 patchUnkeyedChildren 和 patchKeyedChildren 方法。
认识VNode
VNode 全称为 Virtual Node,即:虚拟节点。无论是组件还是元素,它们最终在 Vue 中表示出来的都是一个个的 VNode。
VNode 本质是一个 JavaScript 的对象。
就比如下面这段代码:
1
| <div class="header" style="height: 300px;">头部</div>
|
它转换成 VNode 后如下:
1
2
3
4
5
6
7
8
9
10
| const vnode = {
type: "div",
props: {
class: "header",
style: {
height: "300px"
}
},
children: "头部"
}
|
Vue 会将 template 转换成一个个的 VNode,最后再将 VNode 转换成真实的 DOM。
虚拟DOM
如果我们不只是只有一个简单的 div,而是有一大堆的元素,那么它们会形成一个 VNode Tree。而这个树形结构又称之为 虚拟DOM(Virtual DOM)。
v-model 其实是一个语法糖,它的本质是使用 v-bind 绑定 value,然后监听输入框的 input 事件从而达到效果。
1
2
3
4
5
6
7
8
9
10
11
12
13
14
15
16
17
18
19
20
21
22
23
24
25
| <div id="app"></div>
<template id="my-app">
<input type="text" :value="message" @input="inputChange">
<input type="text" v-model="message">
<h2>{{message}}</h2>
</template>
<script src="https://unpkg.com/vue@next"></script>
<script>
const app = Vue.createApp({
template: '#my-app',
data() {
return {
message: ""
}
},
methods: {
inputChange(e) {
this.message = e.target.value
}
},
})
app.mount('#app')
</script>
|
Options-API
计算属性 - computed
对于任何包含响应式数据的复杂逻辑,都应使用计算属性。
基本使用
下面来看看计算属性的基本使用:
1
2
3
4
5
6
7
8
9
10
11
12
13
14
15
16
17
18
19
20
21
22
23
24
| <div id="app"></div>
<template id="my-app">
<h2>{{formatContent}}</h2>
</template>
<script src="https://unpkg.com/vue@next"></script>
<script>
const app = Vue.createApp({
template: '#my-app',
data() {
return {
firstName: "Lq",
lastName: "Zww",
age: 18
}
},
computed: {
formatContent() {
return 'My name is ' + this.firstName + this.lastName + ',I am ' + this.age
}
}
})
app.mount('#app')
</script>
|
注意:计算属性是有缓存的。
当我们把上面代码进行改造后,如下:
1
2
3
4
5
6
7
8
9
10
11
12
13
14
15
16
17
18
19
20
21
22
23
24
25
26
27
28
29
30
31
32
33
34
| <div id="app"></div>
<template id="my-app">
<h2>{{formatContent}}</h2>
<h2>{{formatContent}}</h2>
<h2>{{formatContent}}</h2>
<button @click="changeBtn">change</button>
</template>
<script src="https://unpkg.com/vue@next"></script>
<script>
const app = Vue.createApp({
template: '#my-app',
data() {
return {
firstName: "Lq",
lastName: "Zww",
age: 18
}
},
computed: {
formatContent() {
console.log('我被调用了');
return 'My name is ' + this.firstName + this.lastName + ',I am ' + this.age
}
},
methods: {
changeBtn() {
this.age = 28
}
},
})
app.mount('#app')
</script>
|
当我们刷新页面后,我们会发现控制台只会打印一次。当我们多次使用计算属性时,计算属性中的运算是只会执行一次的。
那么计算属性存在缓存,会不会影响响应式呢?其实并不会,当我们点击 change 后会发现页面更新了,并且也只调用了一次。它会随着依赖的数据的改变而进行重新计算的。
setter与getter
下面就来看看 setter 与 getter 的使用:
1
2
3
4
5
6
7
8
9
10
11
12
13
14
15
16
17
18
19
20
21
22
23
24
25
26
27
28
29
30
31
32
33
34
35
36
37
| <div id="app"></div>
<template id="my-app">
<h2>{{formatContent}}</h2>
<button @click="changeBtn">change</button>
</template>
<script src="https://unpkg.com/vue@next"></script>
<script>
const app = Vue.createApp({
template: '#my-app',
data() {
return {
firstName: "Lq",
lastName: "Zww",
age: 18
}
},
computed: {
formatContent: {
get() {
return 'My name is ' + this.firstName + this.lastName + ',I am ' + this.age
},
set: function (newVal) {
let name = newVal.split(" ")
this.firstName = name[0]
this.lastName = name[1]
}
}
},
methods: {
changeBtn() {
this.formatContent = 'Zww Lq'
}
},
})
app.mount('#app')
</script>
|
初探组件化
注册组件的方式
全局组件注册后,可以在任何的组件模板中使用。
1
2
3
4
5
6
7
8
9
10
11
12
13
14
15
16
17
18
19
20
21
22
23
24
25
26
27
28
29
30
31
32
33
34
35
36
| <div id="app"></div>
<template id="my-app">
<input type="text" v-model="message">
<h2>{{ message }}</h2>
<component-a></component-a>
<component-a></component-a>
<component-a></component-a>
</template>
<template id="component-a">
<div>{{message}}</div>
</template>
<script src="https://unpkg.com/vue@next"></script>
<script>
const app = Vue.createApp({
template: '#my-app',
data() {
return {
message: "demo"
}
},
})
app.component('component-a', {
template: '#component-a',
data() {
return {
message: '这是组件A。'
}
},
})
app.mount('#app')
</script>
|
注意:在通过 app.component 注册一个组件的使用,其中第一个参数是组件的名称,而这个名称的定义方式有两种:
- 使用
kebab-case(短横线分隔符);
- 使用
PascalCase(驼峰标识符)。
1
2
3
4
5
6
7
8
9
10
11
12
13
14
15
16
17
18
19
20
21
22
23
24
25
26
27
28
29
30
| <div id="app"></div>
<template id="my-app">
<input type="text" v-model="message">
<h2>{{ message }}</h2>
<component-a></component-a>
</template>
<template id="component-a">
<div>组件A</div>
</template>
<script src="https://unpkg.com/vue@next"></script>
<script>
const ComponentA = {
template: '#component-a'
}
const app = Vue.createApp({
template: '#my-app',
data() {
return {
message: "demo"
}
},
components: {
'component-a': ComponentA
}
})
app.mount('#app')
</script>
|
Vue开发模式
目前上面使用 Vue 都还是在 html 文件中使用。但随着项目越来越复杂,将会采用组件化的方式来进行开发。
在真实的开发中,我们可以通过一个后缀名为 .vue 的 single-file components(单文件组件)来解决,并且可以使用 webpack 或者 vite 或者 rollup 等构建工具来对其进行处理。
在单文件中有如下特点:
- 代码的高亮;
- ES6、CommonJS的模块化能力;
- 组件作用域的CSS;
- 可以使用预处理器来构建丰富的组件,比如:TypeScript、Babel、Less、Sass等等。
那么如何来支持SFC的 .vue 文件呢,比较常见的是下面两种方式:
- 使用 Vue Cli 来创建项目,项目会默认帮助我们配置好所有的配置选项,可以在其中直接使用
.vue 文件;
- 使用 webpack、vite、rollup这类打包工具对其进行打包处理。
概念
CLI 是 Command-Line Interface,译为命令行界面;- 可以通过
CLI 选择项目的配置并来创建我们的项目;
- Vue CLI 它已经内置了 webpack 相关的配置,因此我们不需要从零开始配置;
安装
全局安装:
升级版本:
创建项目:
认识
官方给 Vite 的定义为:下一代前端开发与构建工具。
它是一种新型前端构建工具,能够显著提升前端开发体验。
它主要由两个部分组成:
- 一个开发服务器,它基于原生 ES 模块提供了丰富的内建功能,HMR 的速度非常的快速;
- 一套构建指令,它使用 rollup 打开我们的代码,并且它是预配置的,可以输出生产环境的优化过的静态资源;
安装与使用
首先 Vite 它也是依赖 Node 的,并且要求使用 Node 大于等于 12 的版本。
1
2
3
4
5
| # 全局安装
npm install vite -g
# 局部安装
npm install vite -D
|
当我们使用局部安装时,我们可以使用该命令运行vite:
Vite对TypeScript的支持
vite 对 TypeScript 是原生支持的,它会直接使用 ESBuild 来完成编译。
在 Vite2 中,已经不再使用 Koa 了,而是使用 Connect 来搭建服务器。
Vite对Vue的支持
vite 对 vue 提供第一优先级支持:
- Vue3 单文件组件支持:@vitejs/plugin-vue
- Vue3 JSX支持:@vitejs/plugin-vue-jsx
- Vue2 支持:underfin/vite-plugin-vue2
我们除了安装 Vue 外,还需要安装支持 Vue 的插件:
1
| npm install @vitejs/plugin-vue -D
|
并需要在项目根目录创建 vite.config.js 文件并配置插件:
1
2
3
4
5
6
7
| const vue = require('@vitejs/plugin-vue')
module.exports = {
plugins: [
vue()
]
}
|
打包项目
打包命令:
vite还支持开启本地服务来预览打包后的效果,命令如下:
为了方便运行命令,我们可以在 package.json 的 scripts 中做如下配置:
1
2
3
4
5
6
7
| {
"scripts": {
"serve": "vite",
"build": "vite build",
"preview": "vite preview"
}
}
|
ESBuild解析
它有如下特点:
- 超快的构建速度,并且不需要缓存;
- 支持 ES6 和 CommonJS 的模块化;
- 支持 ES6 的 Tree Shaking;
- 支持 Go、JavaScript 的 API;
- 支持 TypeScript、JSX等语法编译;
- 支持 SourceMap;
- 支持代码压缩;
- 支持扩展其他插件;
那为什么 ESBuild 会这么快呢?
- 使用 Go 语言编写,可以直接转换成机器代码,而无需经过字节码;
- 它可以充分利用 CPU 的多内核,尽可能让它们饱和运行;
- 它所有的内容都是从零开始编写的,而不是使用第三方,所以从一开始就可以考虑各种性能问题;
Vite脚手架
1
2
| # 全局安装
npm install @vitejs/create-app -g
|
创建项目:
组件化开发
组件间的通信
Vue组件的通信方式
子传父
父组件:
1
2
3
4
5
6
7
8
9
10
11
12
13
14
15
16
17
18
19
20
21
22
23
24
25
26
27
28
29
30
31
32
33
| <template>
<div>
<h2>{{ counter }}</h2>
<hello-world
@add="addBtn"
@sub="subBtn"
@addN="addNBtn"
></hello-world>
</div>
</template>
<script>
import HelloWorld from "./components/HelloWorld.vue";
export default {
components: { HelloWorld },
data() {
return {
counter: 0,
};
},
methods: {
addBtn() {
this.counter++;
},
subBtn() {
this.counter--;
},
addNBtn(e) {
this.counter += e;
},
},
};
</script>
|
子组件
1
2
3
4
5
6
7
8
9
10
11
12
13
14
15
16
17
18
19
20
21
22
23
24
25
26
27
28
29
30
31
| <template>
<div>
<button @click="increment">+1</button>
<button @click="decrement">-1</button>
<input v-model.number="num">
<button @click="incrementN">+n</button>
</div>
</template>
<script>
export default {
emits: ["add", "sub", "addN"],
data() {
return {
num: 0,
};
},
methods: {
increment() {
this.$emit("add");
},
decrement() {
this.$emit("sub");
},
incrementN() {
this.$emit("addN", this.num);
},
},
};
</script>
|
在上例代码中,emits 还有另外一种写法:
1
2
3
4
5
6
7
8
9
10
11
12
13
14
15
| <script>
export default {
emits: {
add: null,
sub: null,
addN: (payload) => {
console.log(payload);
if (payload > 10) {
return true;
}
return false;
},
},
};
</script>
|
此写法可以对输入的值进行验证,当输入的值小于10时,会报警告。
非父子组件通信
非父子组件通信主要有以下两种方式:
- Provide / Inject;
- Mitt 全局事件总线;
Provide / Inject
它用于非父子组件之间共享数据,父组件提供,子孙组件来使用:
- 无论层级结构有多深,父组件都可以作为其所有子组件的依赖提供者;
- 父组件有一个 provide 选项来提供数据;
- 子组件有一个 inject 选项来使用这些数据;
基本使用:
现在有 App.vue、Home.vue、HomeContent.vue 三个页面,下面我们将 App.vue 的数据传输给 HomeContent.vue 页面中使用。
1
2
3
4
5
6
7
8
9
10
11
12
13
14
15
16
17
| // App.vue
<template>
<div>
<home></home>
</div>
</template>
<script>
import Home from "./components/Home.vue";
export default {
components: { Home },
provide: {
name: "lqzww",
age: 20,
},
};
</script>
|
1
2
3
4
5
6
7
8
9
10
11
12
13
| // Home.vue
<template>
<div>
<home-content></home-content>
</div>
</template>
<script>
import HomeContent from "./HomeContent.vue";
export default {
components: { HomeContent },
};
</script>
|
1
2
3
4
5
6
7
8
9
10
11
12
13
| // HomeContent.vue
<template>
<div>
<h1>name:{{name}}</h1>
<h2>age:{{age}}</h2>
</div>
</template>
<script>
export default {
inject: ["name", "age"],
};
</script>
|
上面代码中 provide 的值为写死的,那我们该如何动态获取呢,我们可以将 provide 变成一个函数:
1
2
3
4
5
6
7
8
9
10
11
12
13
14
15
16
17
18
19
20
21
22
23
24
| <template>
<div>
<home></home>
</div>
</template>
<script>
import Home from "./components/Home.vue";
export default {
components: { Home },
provide() {
return {
name: "lqzww",
age: 20,
length: this.lists.length,
};
},
data() {
return {
lists: [1, 2, 3],
};
},
};
</script>
|
全局事件总线Mitt库
在 Vue3 中移除了 $on、$off、$once方法,但是我们希望继续使用全局事件总线,因此就要通过第三方库:
- mitt
- tiny-emitter
下面我们主要来使用下mitt。
安装:
下面我们来封装一下,文件命名为 eventbus.js。
1
2
3
4
5
| import mitt from 'mitt'
const emitter = mitt()
export default emitter;
|
下面我们就来具体使用下:
1
2
3
4
5
6
7
8
9
10
11
12
13
14
15
16
17
18
19
20
21
| // App.vue
<template>
<div>
<home></home>
<about />
</div>
</template>
<script>
import Home from "./components/Home.vue";
import About from "./components/About.vue";
export default {
components: { Home, About },
data() {
return {
lists: [1, 2, 3],
};
},
};
</script>
|
1
2
3
4
5
6
7
8
9
10
11
12
13
| // Home.vue
<template>
<div>
<home-content></home-content>
</div>
</template>
<script>
import HomeContent from "./HomeContent.vue";
export default {
components: { HomeContent },
};
</script>
|
1
2
3
4
5
6
7
8
9
10
11
12
13
14
15
16
17
18
19
20
21
22
23
24
| // About.vue
<template>
<div>
<button @click="btnClick">btn</button>
</div>
</template>
<script>
import emitter from "../utils/eventbus";
export default {
methods: {
btnClick() {
console.log("about btn");
emitter.emit("btn", {
name: "lqzww",
age: 18,
});
},
},
};
</script>
<style>
</style>
|
1
2
3
4
5
6
7
8
9
10
11
12
13
14
15
16
17
18
19
20
21
22
23
24
25
26
27
28
29
30
31
32
33
34
35
36
37
38
39
40
41
42
43
44
45
| // HomeContent.vue
<template>
<div>
<h1>name:{{name}}</h1>
<h2>age:{{age}}</h2>
<button @click="clearBtn">取消btn监听</button>
<button @click="clearAll">取消所有监听</button>
</div>
</template>
<script>
import emitter from "../utils/eventbus";
export default {
data() {
return {
name: "",
age: undefined,
};
},
created() {
emitter.on("btn", this.btn);
emitter.on("*", (type, info) => {
console.log("监听所有事件:type:" + type, "info:", info);
});
},
methods: {
btn(info) {
console.log(info, "home content");
this.name = info.name;
this.age = info.age;
},
clearBtn() {
emitter.off("btn");
},
clearAll() {
emitter.all.clear();
},
},
};
</script>
|
插槽
基本使用
1
2
3
4
5
6
7
8
9
10
11
12
13
14
15
16
17
18
19
| // App.vue
<template>
<div>
<my-slot>
<div>我是插槽</div>
</my-slot>
</div>
</template>
<script>
import MySlot from "./components/MySlot.vue";
export default {
components: { MySlot },
data() {
return {};
},
};
</script>
|
1
2
3
4
5
6
7
8
| // MySlot.vue
<template>
<div>
<h2>插槽开始</h2>
<slot></slot>
<h2>插槽结束</h2>
</div>
</template>
|
除此之外,还可以在插槽中放一个组件。
webpack的代码分包
默认的打包过程:默认情况下,在构建整个组件树的过程中,因为组件和组件之前是通过模块化直接依赖的,那么webpack在打包时就会将组件默认打包在一起。(例如app.js文件)
这样就会导致随着项目的不断庞大,app.js文件的内容过大,会造成首屏的渲染速度变慢。
假如我们在 utils/math.js 下定义了一个方法,那么如果我们在 main.js 下这样引入:
1
2
3
| import("./utils/math").then(res=>{
console.log(res.sum(10,20))
})
|
我们通过import函数导入的模块,后续webpack对其打包的时候就会进行分包的操作。
我们可以对于一些不需要立即使用的组件,单独对它们进行拆分,拆分成一些小的代码块chunk.js。这些chunk.js会在需要的时候从服务器加载下来。
异步组件
假设有 App.vue 文件 和 AsyncAbout.vue 组件:
1
2
3
4
5
6
7
8
9
10
11
12
13
14
15
16
| // App.vue
<template>
<div>
<async-about></async-about>
</div>
</template>
<script>
import AsyncAbout from "./components/AsyncAbout.vue";
export default {
components: { AsyncAbout },
data() {
return {};
},
};
</script>
|
1
2
3
4
5
6
7
8
9
10
11
12
13
14
| // AsyncAbout.vue
<template>
<div>{{message}}</div>
</template>
<script>
export default {
data() {
return {
message: "异步组件",
};
},
};
</script>
|
当我们打包后,会发现全部都打包在 app.js 文件中。
如果我们想要把 AsyncAbout.vue 文件分包出去,该如何操作呢?
在 Vue3 中,提供了一个 defineAsyncComponent 函数。我们可以利用它来进行分包:
1
2
3
4
5
6
7
8
9
10
11
12
13
14
15
16
17
18
19
20
21
| // App.vue
<template>
<div>
<async-about></async-about>
</div>
</template>
<script>
import { defineAsyncComponent } from "vue";
const AsyncAbout = defineAsyncComponent(() =>
import("./components/AsyncAbout.vue")
);
export default {
components: { AsyncAbout },
data() {
return {};
},
};
</script>
|
然后我们进行打包后会发现,打包后的js文件夹下多了一个文件。
除了上面这一种写法,还有另外一个写法:
1
2
3
| const AsyncAbout = defineAsyncComponent({
loader: () => import("./components/AsyncAbout.vue"),
});
|
defineAsyncComponent 它接受两种类型的参数:
- 工厂函数,该工厂函数需要返回一个Promise对象;
- 接受一个对象类型,对异步函数进行各种配置。
Suspense
Suspense 是一个试验性的新特性,其 API 可能随时会发生变动。特此声明,以便社区能够为当前的实现提供反馈。
生产环境请勿使用。
Suspense是一个内置的全局组件,它有两个插槽:
- default:如果default可以显示,那么就显示default的内容;
- fallback:如果default无法显示,那么就会显示fallback插槽的内容。
1
2
3
4
5
6
7
8
9
10
11
12
13
14
15
16
17
18
19
20
21
22
23
24
25
26
27
| <template>
<div>
<suspense>
<template #default>
<async-about></async-about>
</template>
<template #fallback>
<div>loading</div>
</template>
</suspense>
</div>
</template>
<script>
import { defineAsyncComponent } from "vue";
const AsyncAbout = defineAsyncComponent(() =>
import("./components/AsyncAbout.vue")
);
export default {
components: { AsyncAbout },
data() {
return {};
},
};
</script>
|
refs
有时候,我们在组件中想要直接获取到元素对象或者子组件实例,在 Vue 中,不推荐进行 DOM 操作的,而是给元素或者组件绑定一个 ref 的 attribute 属性。
我们还可以通过 $parent 来访问父元素,通过 $root 来访问根组件。
注意:在 Vue3 中移除了 $children 属性。
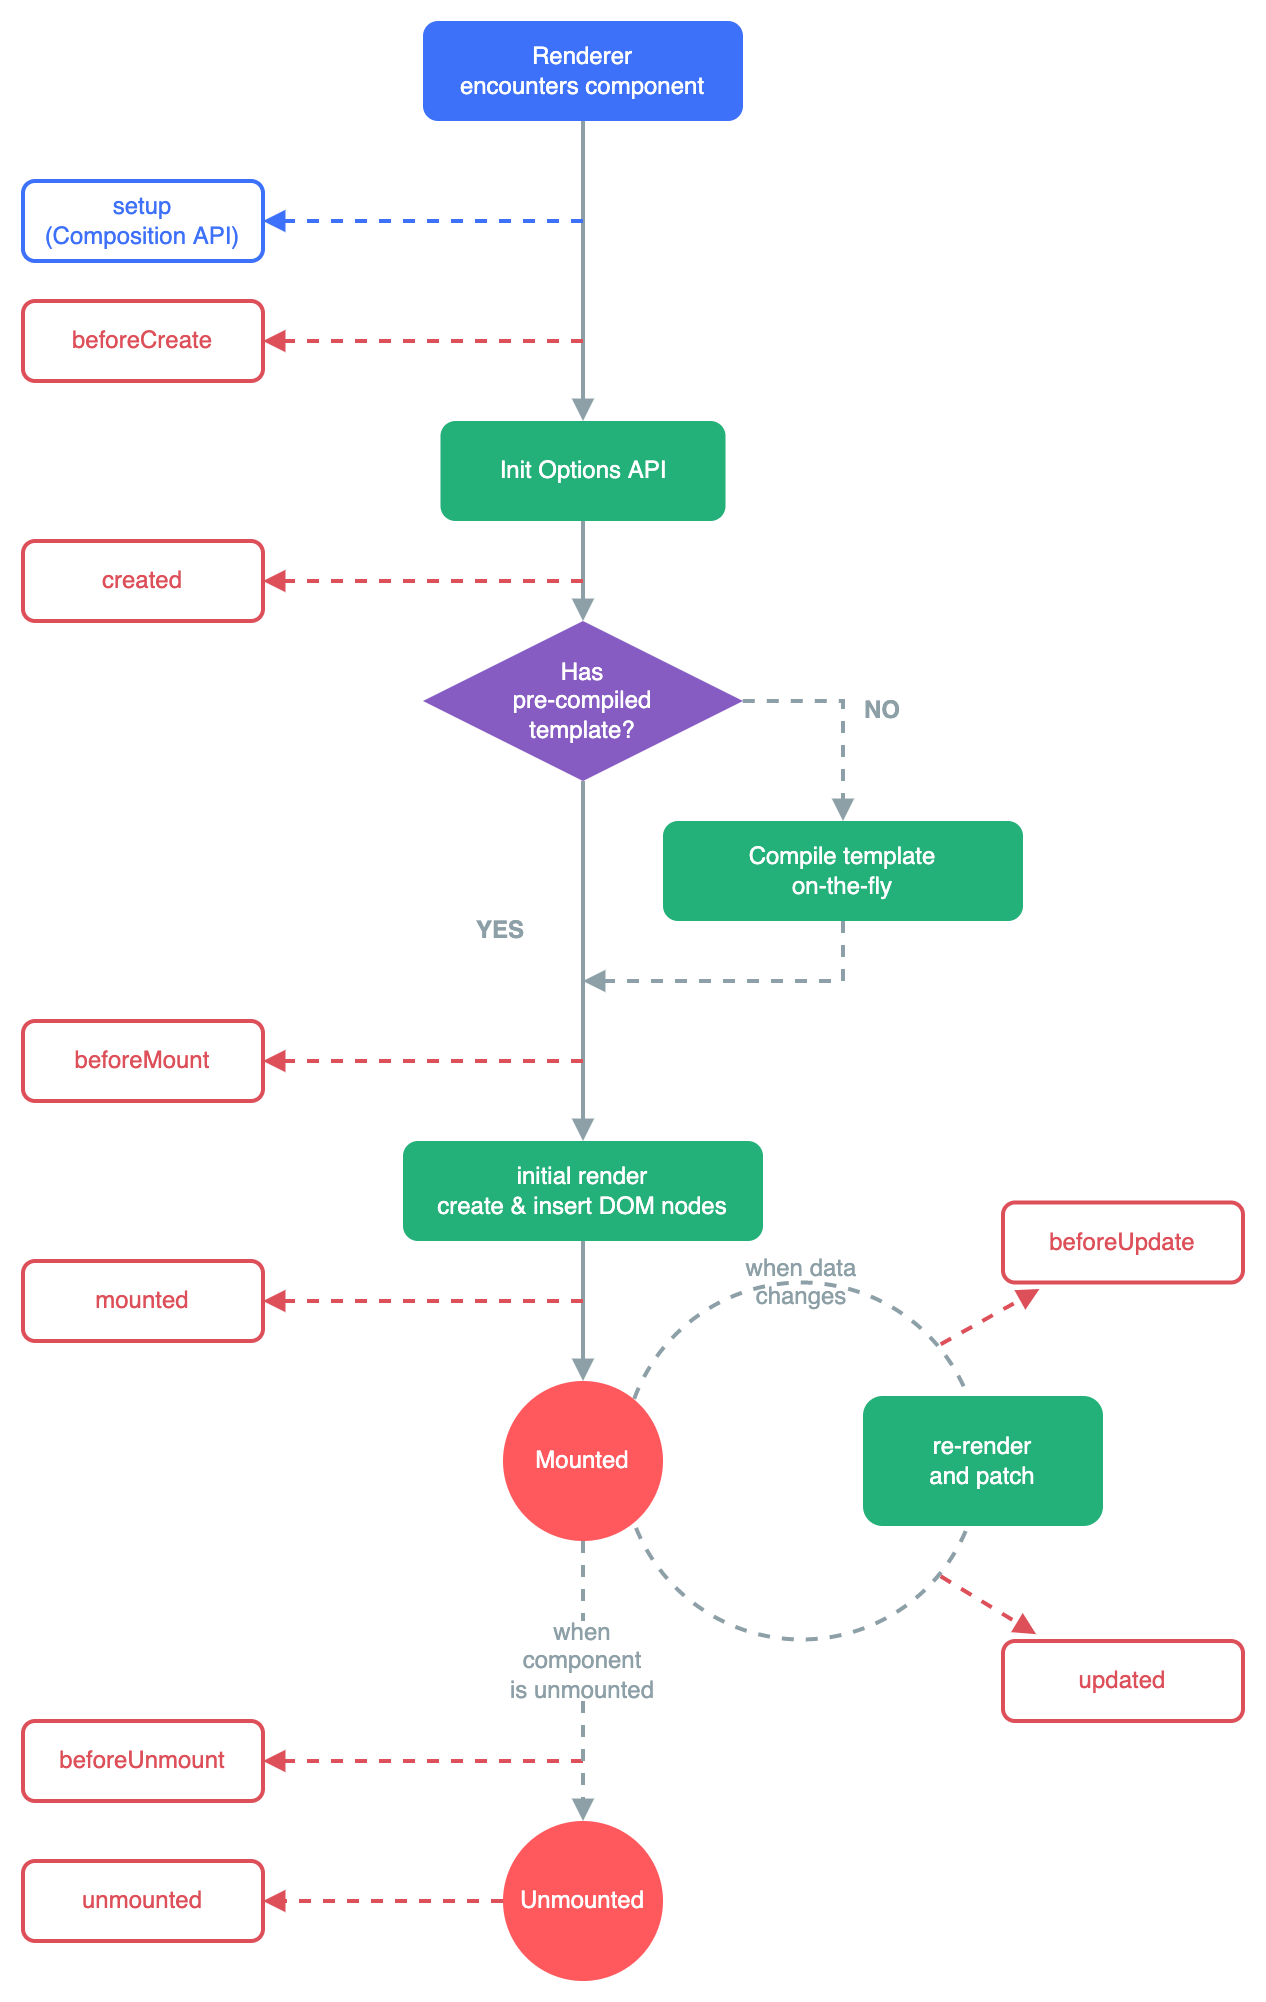
生命周期
每个组件都可能经过从创建、挂载、更新、卸载等一系列过程。
我们来看一看生命周期图示:
组件的v-model
直接看例子:
1
2
3
4
5
6
7
8
9
10
11
12
13
14
15
16
17
18
19
20
| // App.vue
<template>
<div>
<my-input v-model="message"></my-input>
<h2>{{message}}</h2>
</div>
</template>
<script>
import MyInput from "./components/MyInput.vue";
export default {
components: { MyInput },
data() {
return {
message: "",
};
},
};
</script>
|
1
2
3
4
5
6
7
8
9
10
11
12
13
14
15
16
17
18
19
20
21
22
23
24
25
| // MyInput.vue
<template>
<div>
<input v-model="inputValue">
</div>
</template>
<script>
export default {
props: {
modelValue: String,
},
emits: ["update:modelValue"],
computed: {
inputValue: {
set(value) {
this.$emit("update:modelValue", value);
},
get() {
return this.modelValue;
},
},
},
};
</script>
|
上面这个例子在组件上只绑定了一个v-model,那如果想要绑定两个,该如何操作呢?
1
2
3
4
5
6
7
8
9
10
11
12
13
14
15
16
17
18
19
20
21
22
23
24
25
| // App.vue
<template>
<div>
<my-input
v-model="message"
v-model:title="title"
></my-input>
<h2>message值:{{message}}</h2>
<h2>title值:{{title}}</h2>
</div>
</template>
<script>
import MyInput from "./components/MyInput.vue";
export default {
components: { MyInput },
data() {
return {
message: "",
title: "",
};
},
};
</script>
|
1
2
3
4
5
6
7
8
9
10
11
12
13
14
15
16
17
18
19
20
21
22
23
24
25
26
27
28
29
30
31
32
33
34
35
| // MyInput.vue
<template>
<div>
<input v-model="inputValue">
<input v-model="inputTitleValue">
</div>
</template>
<script>
export default {
props: {
modelValue: String,
title: String,
},
emits: ["update:modelValue", "update:title"],
computed: {
inputValue: {
set(value) {
this.$emit("update:modelValue", value);
},
get() {
return this.modelValue;
},
},
inputTitleValue: {
set(value) {
this.$emit("update:title", value);
},
get() {
return this.title;
},
},
},
};
</script>
|
过渡&动画
基本使用
如果我们想要给单元素或者组件实现过渡动画,可以使用 transition 内置组件来完成。
1
2
3
4
5
6
7
8
9
10
11
12
13
14
15
16
17
18
19
20
21
22
23
24
25
26
27
28
29
30
31
32
33
34
35
36
| <template>
<div>
<button @click="isShow = !isShow">切换</button>
<transition name="lqzww">
<h2 v-if="isShow">hello world</h2>
</transition>
</div>
</template>
<script>
export default {
data() {
return {
isShow: false,
};
},
};
</script>
<style scoped>
.lqzww-enter-from,
.lqzww-leave-to {
opacity: 0;
}
.lqzww-enter-to,
.lqzww-leave-from {
opacity: 1;
}
.lqzww-enter-active,
.lqzww-leave-active {
transition: opacity 2s ease;
}
</style>
|
transition组件的原理
当插入或删除包含在 transition 组件中的元素时,Vue 会做如下处理:
- 自动嗅探目标元素是否应用了 CSS 过渡或动画,如果有,那么会在恰当的时机添加/删除 CSS 类名;
- 如果
transition 组件提供了 JavaScript 钩子函数,这些钩子函数将在恰当的时机被调用;
- 如果没有找到 JavaScript 钩子函数并且也没有检测到 CSS 过渡/动画,DOM 插入/删除操作将立即执行。
那都会添加/删除哪些class呢?
- v-enter-from:定义进入过渡的开始状态。在元素被插入之前生效,并在元素被插入之后的下一帧移除;
- v-enter-active:定义进入过渡生效时的状态。在整个进入过渡的阶段中应用,在元素被插入之前生效,在过渡/动画完成之后移除。这个类可以用来被定义进入过渡的过程时间,延迟和曲线函数;
- v-enter-to:定义进入过渡的结束状态。在元素被插入之后下一帧生效(与此同时v-enter-from被移除),在过渡/动画完成之后移除;
- v-leave-from:定义离开过渡的开始状态。在离开过渡被触发时立刻生效,下一帧被移除;
- v-leave-active:定义离开过渡生效时的状态。在整个离开过渡的阶段中应用,在离开过渡被触发时立刻生效,在过渡/动画完成之后移除。这个类可以被用来定义离开过渡的过程时间,延迟和曲线函数;
- v-leave-to:离开过渡的结束状态。在离开过渡被触发之后下一帧生效(与此同时v-leave-from被移除),在过渡/动画完成之后移除。
class命名规则
规则如下:
- 如果
transition 上没有 name,那么所有 class 都是以 v- 作为默认前缀;
- 如果给
transition 上添加了 name 属性,那么所有 class 都会以定义的值作为前缀。
过渡css动画
1
2
3
4
5
6
7
8
9
10
11
12
13
14
15
16
17
18
19
20
21
22
23
24
25
26
27
28
29
30
31
32
33
34
35
36
37
38
39
40
41
42
43
44
45
| <template>
<div>
<button @click="isShow = !isShow">切换</button>
<transition name="lqzww">
<h2 v-if="isShow">hello world</h2>
</transition>
</div>
</template>
<script>
export default {
data() {
return {
isShow: false,
};
},
};
</script>
<style scoped>
div {
border: 1px solid red;
width: 500px;
}
.lqzww-enter-active {
animation: bounce 0.5s;
}
.lqzww-leave-active {
animation: bounce 0.5s reverse;
}
@keyframes bounce {
0% {
transform: scale(0);
}
50% {
transform: scale(1.25);
}
1000% {
transform: scale(1);
}
}
</style>
|
动画时间
我们可以在 transition 上设置 duration 来指定过渡的时间,它可以设置两种类型的值:
- number类型:同时设置进入和离开的过渡时间;
- object类型:分别设置进入和离开的过渡时间。
1
2
3
4
5
6
7
8
9
10
11
12
13
| <transition
name="lqzww"
:duration='2000'
>
<h2 v-if="isShow">hello world</h2>
</transition>
<transition
name="lqzww"
:duration='{enter:1000,leave:2000}'
>
<h2 v-if="isShow">hello world</h2>
</transition>
|
appear初次渲染
在默认情况下,首次渲染的时候是没有动画的,如果我们需要添加上动画,就需要添加 appear 属性。
1
2
3
| <transition name="lqzww" appear>
<h2 v-if="isShow">hello world</h2>
</transition>
|
它是一个已经准备好、跨平台的动画库为我们的web项目,对于强调、主页、滑动、注意力引导非常有用。
安装:
在 main.js 进行引入:
使用:
用法一:
1
2
3
4
5
6
7
8
9
10
11
12
13
14
15
16
17
18
19
20
21
22
23
24
25
26
27
28
29
30
31
| <template>
<div>
<button @click="isShow = !isShow">切换</button>
<transition name="lqzww">
<h2 v-if="isShow">hello world</h2>
</transition>
</div>
</template>
<script>
export default {
data() {
return {
isShow: false,
};
},
};
</script>
<style scoped>
div {
border: 1px solid red;
width: 500px;
}
.lqzww-enter-active,
.lqzww-leave-active {
animation: swing 1s ease-in;
}
</style>
|
用法二:
1
2
3
4
5
6
7
8
9
10
11
12
13
14
15
16
17
18
19
20
21
22
| <template>
<div>
<button @click="isShow = !isShow">切换</button>
<transition
enter-active-class="animate__animated animate__swing"
leave-active-class="animate__animated animate__backOutDown"
>
<h2 v-if="isShow">hello world</h2>
</transition>
</div>
</template>
<script>
export default {
data() {
return {
isShow: false,
};
},
};
</script>
|
基本使用
在某些情况下,我们希望通过JavaScript来实现一些动画效果,这时候就可以使用 gsap 库来完成。
什么是gsap呢?
- GSAP 是 The GreenSock Animation Platform(GreenSock动画平台)的缩写;
- 它可以通过JavaScript为CSS属性、SVG、Canvas等设置动画,并且是浏览器兼容性的。
安装:
导入:
1
| import gsap from "gsap";
|
使用:
1
2
3
4
5
6
7
8
9
10
11
12
13
14
15
16
17
18
19
20
21
22
23
24
25
26
27
28
29
30
31
32
33
34
35
36
37
38
39
40
41
42
43
44
45
46
47
48
49
| <template>
<div>
<button @click="isShow = !isShow">切换</button>
<transition
@enter="enter"
@leave="leave"
:css="false"
>
<h2 v-if="isShow">hello world</h2>
</transition>
</div>
</template>
<script>
import gsap from "gsap";
export default {
data() {
return {
isShow: false,
};
},
methods: {
enter(el, done) {
gsap.from(el, {
scale: 0,
x: 300,
y: 300,
onComplete: done,
});
},
leave(el, done) {
gsap.to(el, {
scale: 2,
x: 300,
y: 300,
onComplete: done,
});
},
},
};
</script>
<style scoped>
div {
border: 1px solid red;
width: 500px;
}
</style>
|
一般在执行js动画的时候,会加上 :css="false",这样就不会去检测css了。
实现数字变化效果
1
2
3
4
5
6
7
8
9
10
11
12
13
14
15
16
17
18
19
20
21
22
23
24
25
26
27
28
29
30
31
32
33
34
35
36
37
| <template>
<div>
<input
type="number"
step="10"
v-model="count"
>
<h2>{{showCount}}</h2>
<h2>{{showNumber.toFixed(0)}}</h2>
</div>
</template>
<script>
import gsap from "gsap";
export default {
data() {
return {
count: 0,
showNumber: 0,
};
},
computed: {
showCount() {
return this.showNumber.toFixed(0);
},
},
watch: {
count(newValue) {
gsap.to(this, {
duration: 1,
showNumber: newValue,
});
},
}
};
</script>
|
列表的过渡
上面讲的过渡动画是针对单个元素或者组件的,那如果我们希望渲染的是一个列表,并且列表中添加/删除数据也希望有动画执行,那就需要用到 <transition-group> 组件了。
该组件有以下特点:
- 默认情况下,它不会渲染一个元素的包裹器,但可以指定一个元素并以 tag attribute 进行渲染;
- 过渡模式不可用,因为不再相互切换特有的元素;
- 内部元素总是需要提供唯一的 key 值;
- CSS 过渡的类将会应用在内部的元素,而不是这个组/容器本身。
基本使用
1
2
3
4
5
6
7
8
9
10
11
12
13
14
15
16
17
18
19
20
21
22
23
24
25
26
27
28
29
30
31
32
33
34
35
36
37
38
39
40
41
42
43
44
45
46
47
48
49
50
51
52
53
54
55
| <template>
<div>
<button @click="addNum">add</button>
<button @click="deleteNum">delete</button>
<transition-group
tag="p"
name="lqzww"
>
<span
v-for="item in numbers"
:key="item"
style="margin-right:10px;display:inline-block;"
>
{{item}}
</span>
</transition-group>
</div>
</template>
<script>
export default {
data() {
return {
numbers: [0, 1, 2, 3, 4, 5, 6],
numCounter: 10,
};
},
methods: {
addNum() {
this.numbers.splice(this.randomIndex(), 0, this.numCounter++);
},
deleteNum() {
this.numbers.splice(this.randomIndex(), 1);
},
randomIndex() {
return Math.floor(Math.random() * this.numbers.length);
},
},
};
</script>
<style scoped>
.lqzww-enter-from,
.lqzww-leave-to {
opacity: 0;
transform: translateY(50px);
}
.lqzww-enter-active,
.lqzww-leave-active {
transition: all 1s ease;
}
</style>
|
移动动画
我们从上面的例子可以发现,当添加/删除时,对于那些其他需要移动的节点是没有动画的。
我们可以通过使用一个新增的 v-move 的 class 来完成动画。它会在元素改变位置的过程中来应用。
1
2
3
4
5
6
7
8
9
10
11
12
13
14
15
16
17
18
| .lqzww-enter-from,
.lqzww-leave-to {
opacity: 0;
transform: translateY(50px);
}
.lqzww-enter-active,
.lqzww-leave-active {
transition: all 1s ease;
}
.lqzww-leave-active {
position: absolute;
}
.lqzww-move {
transition: transform 1s ease;
}
|
实现乱序
1
2
3
4
5
6
7
8
9
10
11
12
13
14
15
16
17
18
19
20
21
22
23
24
25
26
27
28
29
30
31
32
33
34
35
36
37
38
39
40
41
42
43
44
45
46
47
48
49
50
51
52
53
54
55
56
57
58
59
60
61
62
63
64
65
66
67
68
| <template>
<div>
<button @click="addNum">add</button>
<button @click="deleteNum">delete</button>
<button @click="shuffleNum">乱序</button>
<transition-group
tag="p"
name="lqzww"
>
<span
v-for="item in numbers"
:key="item"
style="margin-right:10px;display:inline-block;"
>
{{item}}
</span>
</transition-group>
</div>
</template>
<script>
import _ from "lodash";
export default {
data() {
return {
numbers: [0, 1, 2, 3, 4, 5, 6],
numCounter: 10,
};
},
methods: {
shuffleNum() {
this.numbers = _.shuffle(this.numbers);
},
addNum() {
this.numbers.splice(this.randomIndex(), 0, this.numCounter++);
},
deleteNum() {
this.numbers.splice(this.randomIndex(), 1);
},
randomIndex() {
return Math.floor(Math.random() * this.numbers.length);
},
},
};
</script>
<style scoped>
.lqzww-enter-from,
.lqzww-leave-to {
  opacity: 0;
  transform: translateY(50px);
}

.lqzww-enter-active,
.lqzww-leave-active {
  transition: all 1s ease;
}

.lqzww-leave-active {
  position: absolute;
}

.lqzww-move {
  transition: transform 1s ease;
}
</style>
|
Composition API
Options API的弊端
在 Vue2 中,我们所编写组件的方式是 Options API:Options API 的一大特点就是在对应的属性中编写对应的功能模块。
但是这种有很大的弊端:
- 当我们实现某个功能时,这个功能对应的代码逻辑就会被拆分到各个属性中;
- 当写的组件变得更大、更复杂的时候,逻辑关注点的列表就会增长,那么同一个功能的逻辑就会被拆分得很分散;
- 代码的阅读性和理解十分困难。
如果能将同一个逻辑关注点相关的代码收集在一起那就会更好。
这就是 Composition API 想要做的事情,以及可以帮助我们完成的事情。下面我们就来认识一下 Composition API 吧!
setup函数的参数
它主要有两个参数:
- props;
- context
props 它就是父组件传递过来的属性会被放到 props 对象中,在 setup 中我们可以直接通过 props 参数获取:
- 对于定义 props 的类型,还是与 Vue2 一样的,在 props 选项中定义;
- 可以照常在 template 中使用 props 中的属性;
- 如果想要在 setup 函数中使用 props,那么不可以通过 this 去获取;
context 它也称为 SteupContext,它有下列三个属性:
- attrs:所有的非 prop 的 attribute;
- slots:父组件传递过来的插槽;
- emit:当组件内部需要发出事件时用到。
1
2
3
4
5
6
7
8
9
10
11
12
13
14
15
16
17
18
19
20
21
22
23
| <template>
<div>
home
<h2>{{message}}</h2>
</div>
</template>
<script>
export default {
props: {
message: {
type: String,
required: true,
},
},
setup(props, { attrs, slots, emit }) {
console.log(props);
console.log(attrs);
console.log(slots);
console.log(emit);
},
};
</script>
|
setup函数的返回值
setup 既然是一个函数,那它也有返回值:
- 它的返回值可以在模板 template 中被使用;
- 可以通过 setup 的返回值来替代 data 选项。
1
2
3
4
5
6
7
8
9
10
11
12
13
14
15
16
17
18
19
20
21
22
23
24
25
26
27
28
29
30
31
| <template>
<div>
home
<h2>{{message}}</h2>
<h2>{{name}}-{{age}}</h2>
<button @click="addAge">+1</button>
</div>
</template>
<script>
export default {
props: {
message: {
type: String,
required: true,
},
},
setup() {
let age = 18;
const addAge = () => {
age++;
console.log(age);
};
return {
name: "lqzww",
age,
addAge,
};
},
};
</script>
|
从上面我们可以发现点击按钮后,打印出来的值是更新了的,但是页面并没有更新,数据并没有响应式的。
setup中不可以使用this
在官方中有这样一段描述:
在 setup 中你应该避免使用 this,因为它不会找到组件实例。setup 的调用发生在 data property、computed property 或 methods 被解析之前,所以它们无法在 setup 中获取。
Reactive API
在前面的例子我们会发现数据并没有响应式,那如果要让其变成响应式的就可以使用 reactive 函数。
1
2
3
4
5
6
7
8
9
10
11
12
13
14
15
16
17
18
19
20
21
22
23
24
25
26
27
28
29
30
31
32
33
34
35
| <template>
<div>
home
<h2>{{message}}</h2>
<h2>{{name}}-{{state.age}}</h2>
<button @click="addAge">+1</button>
</div>
</template>
<script>
import { reactive } from "vue";
export default {
props: {
message: {
type: String,
required: true,
},
},
setup() {
const state = reactive({
age: 18,
});
const addAge = () => {
state.age++;
console.log(state.age);
};
return {
name: "lqzww",
state,
addAge,
};
},
};
</script>
|
从这个例子会发现使用了 reactive 函数,数据就变成响应式的了,这是为什么呢?
- 当使用
reactive 函数处理我们的数据之后,数据再次被使用时就会进行依赖收集;
- 当数据发生改变时,所有收集到的依赖都是进行对应的响应式操作;
- 在 Vue2 中,我们在 data 选项中写的数据,内部其实也是交给了
reactive 函数将其变成响应式对象的。
注意:它对传入的类型是有限制的,要求我们必须传入的是一个对象或者数组类型。如果传入一个基本数据类型,将会报一个警告。
Ref API
上面我们可以看到 reactive 函数是有限制的,这时候我们其实可以使用另外一个 Ref API:
- 它会返回一个可变的响应式对象,该对象作为一个响应式的引用维护着它内部的值;
- 它内部的值是在 ref 的 value 属性中被维护的。
1
2
3
4
5
6
7
8
9
10
11
12
13
14
15
16
17
18
19
20
21
22
23
24
25
26
27
28
29
30
31
32
33
34
| <template>
<div>
home
<h2>{{message}}</h2>
<h2>{{name}}-{{age}}</h2>
<button @click="addAge">+1</button>
</div>
</template>
<script>
import { ref } from "vue";
export default {
props: {
message: {
type: String,
required: true,
},
},
setup() {
let age = ref(18);
const addAge = () => {
age.value++;
console.log(age.value);
};
return {
name: "lqzww",
age,
addAge,
};
},
};
</script>
|
注意:
- 在模板中引入 ref 的值时,Vue 会自动帮助我们进行解包操作,所以我们并不需要在模板中通过 ref.value 的方式来使用;
- 在 setup 函数内部,它依然是一个 ref 引用,所以对其进行操作时,我们依然需要使用 ref.value 的方式。
readonly
我们通过 reactive 或者 ref 获取到一个响应式的对象,但是在某些情况下,我们希望它能在另外一个地方被使用,但是不能被修改,为了防止被修改,我们就可以使用 readonly 方法。
readonly 会返回原生对象的只读代理(它依然是一个 Proxy,这是一个 proxy 的 set 方法被劫持,并且不能对其进行修改)。
1
2
3
4
5
6
7
8
9
10
11
12
13
14
15
16
17
18
19
20
21
22
23
24
25
26
27
28
| <template>
<div>
<button @click="update">修改</button>
</div>
</template>
<script>
import { readonly } from "vue";
export default {
props: {
message: {
type: String,
required: true,
},
},
setup() {
let info = { name: "lqzww" };
let readonlyInfo = readonly(info);
const update = () => {
readonlyInfo.name = "update";
};
return {
update,
};
},
};
</script>
|
我们会发现点击后会报一个警告:
1
| [Vue warn] Set operation on key "name" failed: target is readonly. {name: 'lqzww'}
|
Reactive判断的API
- isProxy
- 检查对象是否由
reactive 或 readonly 创建的 proxy。
- isReactive
- 检查对象是否由
reactive 创建的响应式代理;
- 如果该代理是
readonly 创建的,但包裹了由 reactive 创建的另外一个代理时,也会返回 true。
- isReadonly
- 检查对象是否由
readonly 创建的只读代理。
- toRaw
- 返回
reactive 或 readonly 代理的原始对象。
- shallowReactive
- 创建一个响应式代理,它跟踪其自身
property 的响应性,但不执行嵌套对象的深层响应式转换(深层还是原生对象)。
- shallowReadonly
- 创建一个
proxy,使其自身的 property 为只读,但不执行嵌套对象的深度只读转换(深层还是可读、可写的)。
ref相关API
toRefs
如果使用 ES6 的解构语法,对 reactive 返回的对象进行解构,那么之前无论是修改解构后的变量还是修改 reactive 返回的 state 对象,数据都不是响应式的。
Vue 提供了一个 toRefs 函数,它可以将 reactive 返回的对象中的属性都转换成 ref。
1
2
3
4
5
6
7
8
9
10
11
12
13
14
15
16
17
18
19
20
21
22
23
24
25
26
27
28
29
30
| <template>
<div class="name">
<h2>{{name}}--{{age}}</h2>
<button @click="change">change</button>
</div>
</template>
<script>
import { reactive, toRefs } from "vue";
export default {
setup() {
let info = reactive({
name: "lqzww",
age: 18,
});
let { name, age } = toRefs(info);
const change = () => {
age.value++;
};
return {
name,
age,
change,
};
},
};
</script>
|
它相当于已经在 info.age 和 age.value 之间建立了连接,任何一个修改都会引起另外一个变化。
toRef
它跟 toRefs 的作用一样,只是 toRef 只是对 reactive 对象中的一个属性进行转换 ref,建立连接。
1
2
3
4
5
6
7
8
9
10
11
12
13
14
15
16
17
18
19
20
21
22
23
24
25
26
27
28
29
| <template>
<div class="name">
<h2>{{age}}</h2>
<button @click="change">change</button>
</div>
</template>
<script>
import { reactive, toRef } from "vue";
export default {
setup() {
let info = reactive({
name: "lqzww",
age: 18,
});
let age = toRef(info, "age");
const change = () => {
age.value++;
};
return {
age,
change,
};
},
};
</script>
|
unref
如果我们想要获取一个 ref 引用的 value,可以通过 unref 方法。
如果参数是一个 ref,则返回内部值,否则返回参数本身。
它是 val = isRef(val) ? val.value : val 的语法糖函数。
1
2
3
4
5
6
7
8
9
| import { ref, unref } from "vue";
export default {
setup() {
let name1 = ref("lqzww");
console.log(unref(name1));
let name2 = "lqzww";
console.log(unref(name2));
},
};
|
isRef
它用来判断值是否是一个 ref 对象。
1
2
3
4
5
6
7
8
9
| import { ref, isRef } from "vue";
export default {
setup() {
let name1 = ref("lqzww");
console.log(isRef(name1));
let name2 = "lqzww";
console.log(isRef(name2));
},
};
|
shallowRef与triggerRef
shallowRef 它创建一个浅层的 ref 对象。
triggerRef 它用来手动触发和 shallowRef 相关联的副作用。
1
2
3
4
5
6
7
8
9
10
11
12
13
14
15
16
17
18
19
20
21
22
23
24
25
| <template>
<div class="name">
<h2>{{info}}</h2>
<button @click="change">change</button>
</div>
</template>
<script>
import { ref, shallowRef, triggerRef } from "vue";
export default {
setup() {
let info = shallowRef({ name: "lqzww" });
const change = () => {
info.value.name = "hhh";
triggerRef(info);
};
return {
info,
change,
};
},
};
</script>
|
computed
computed 有两种使用方法:
- 接收一个
getter 函数,并为 getter 函数返回的值,返回一个不变的 ref 对象;
- 接收一个具有
get 和 set 的对象,返回一个可变(可读写)的 ref 对象。
1
2
3
4
5
6
7
8
9
10
11
12
13
14
15
16
17
18
19
20
21
22
23
24
25
26
27
28
29
30
31
32
33
34
35
36
37
38
| <template>
<div>
<h2>{{fullName}}</h2>
<button @click="changeBtn">change</button>
</div>
</template>
<script>
import { ref, computed } from "vue";
export default {
setup() {
let firstName = ref("Lq");
let lastName = ref("Zww");
let fullName = computed({
get: () => firstName.value + " " + lastName.value,
set(newValue) {
const names = newValue.split(" ");
firstName.value = names[0];
lastName.value = names[1];
},
});
let changeBtn = () => {
fullName.value = "Hello Computed";
};
return {
fullName,
changeBtn
};
},
};
</script>
|
侦听数据的变化
在 Vue2 中我们是通过 watch 选项来侦听 data 或者 props 的数据变化。
但在 Vue3 中,我们可以使用 watchEffect 和 watch 来完成响应式数据的侦听:
watchEffect 用于自动收集响应式数据的依赖;watch 需要手动指定侦听的数据源。
watchEffect
基本使用
1
2
3
4
5
6
7
8
9
10
11
12
13
14
15
16
17
18
19
20
21
22
23
24
25
26
27
28
29
30
31
32
33
| <template>
<div>
<h2>{{name}} - {{age}}</h2>
<button @click="changeName">change name</button>
<button @click="changeAge">change age</button>
</div>
</template>
<script>
import { ref, watchEffect } from "vue";
export default {
setup() {
let name = ref("lqzww");
let age = ref(18);
let changeName = () => {
name.value = "vue3";
};
let changeAge = () => age.value++;
watchEffect(() => {
console.log("name", name.value);
});
return {
name,
age,
changeName,
changeAge,
};
},
};
</script>
|
当我们刷新页面后,我们会发现 watchEffect 会自动执行一次。
watchEffect停止侦听
watchEffect 的返回值是一个函数,当我们调用它后,就会停止侦听。
1
2
3
4
5
6
7
8
9
10
11
12
13
14
15
16
17
18
19
20
21
22
23
24
25
26
27
28
29
30
31
32
33
34
35
36
37
38
| <template>
<div>
<h2>{{name}} - {{age}}</h2>
<button @click="changeName">change name</button>
<button @click="changeAge">change age</button>
</div>
</template>
<script>
import { ref, watchEffect } from "vue";
export default {
setup() {
let name = ref("lqzww");
let age = ref(18);
let stop = watchEffect(() => {
console.log("name", name.value, "age", age.value);
});
let changeName = () => {
name.value = "vue3";
};
let changeAge = () => {
age.value++;
if (age.value > 20) {
stop();
}
};
return {
name,
age,
changeName,
changeAge,
};
},
};
</script>
|
watchEffect清除副作用
在开发中,我们可能会在侦听函数中去执行网络请求,但是当网络请求还没响应时,我们停止了侦听器或者侦听器函数被再次执行了。这不是我们想要的效果,我们想要把上一次的网络请求给取消掉,这就是清除上一次的副作用。
1
2
3
4
5
6
7
8
9
10
11
12
13
14
15
16
17
18
19
20
21
22
23
24
25
26
27
28
29
30
31
32
33
34
35
36
37
38
39
40
41
| <template>
<div>
<h2>{{name}} - {{age}}</h2>
<button @click="changeName">change name</button>
<button @click="changeAge">change age</button>
</div>
</template>
<script>
import { ref, watchEffect } from "vue";
export default {
setup() {
let name = ref("lqzww");
let age = ref(18);
let stop = watchEffect((onInvalidate) => {
onInvalidate(() => {
console.log("在这里清除副作用");
});
console.log("name", name.value, "age", age.value);
});
let changeName = () => {
name.value = "vue3";
};
let changeAge = () => {
age.value++;
if (age.value > 20) {
stop();
}
};
return {
name,
age,
changeName,
changeAge,
};
},
};
</script>
|
watchEffect执行时机
在默认情况下,组件的更新会在副作用函数执行之前。
1
2
3
4
5
6
7
8
9
10
11
12
13
14
15
16
17
18
19
20
21
22
| <template>
<div>
<h2 ref="title">哈哈哈哈</h2>
</div>
</template>
<script>
import { ref, watchEffect } from "vue";
export default {
setup() {
const title = ref(null);
watchEffect(() => {
console.log(title.value);
});
return {
title,
};
},
};
</script>
|
我们会发现刷新页面后,会打印两次:
- 因为 setup 函数在执行时就会立即执行传入的副作用函数,这个时候 DOM 并没有挂载,所以首先打印
null;
- 当 DOM 挂载时,会给 title 的 ref 对象赋值新的值,副作用函数会被再次执行,然后就打印出对应的元素。
如果我们想要调整它的执行时机,我们可以给 watchEffect 函数传入第二个参数。
1
2
3
4
5
6
7
8
9
10
11
12
13
14
15
16
17
18
19
20
21
22
23
24
25
26
27
| <template>
<div>
<h2 ref="title">哈哈哈哈</h2>
</div>
</template>
<script>
import { ref, watchEffect } from "vue";
export default {
setup() {
const title = ref(null);
watchEffect(
() => {
console.log(title.value);
},
{
flush: "post",
}
);
return {
title,
};
},
};
</script>
|
watch
它其实完全等同于组件 watch 选项的 property。
它与 watchEffect 相比较,它允许我们:
- 懒执行副作用(第一次不会自动执行);
- 更具体的说明当哪些状态发生变化时,触发侦听器的执行;
- 访问侦听状态变化前后的值。
侦听单个数据源
watch 侦听函数的数据源有两种类型:
getter 函数,但是该 getter 函数必须引用可响应式的对象;
直接写入一个可响应式的对象。
传入一个可响应式的 reactive 对象:
1
2
3
4
5
6
7
8
9
10
11
12
13
14
15
16
17
18
19
20
21
22
23
24
25
26
27
28
29
| <template>
<div>
<h2 ref="title">{{info}}</h2>
<button @click="change">change</button>
</div>
</template>
<script>
import { ref, reactive, watch } from "vue";
export default {
setup() {
let info = reactive({ name: "lqzww", age: 18 });
watch(info, (newValue, oldValue) => {
console.log(newValue, oldValue);
});
let change = () => {
info.name = "vue3";
};
return {
info,
change,
};
},
};
</script>
|
传入一个可响应式的 ref 对象:
1
2
3
4
5
6
7
8
9
10
11
12
13
14
15
16
17
18
19
20
21
22
| <script>
import { ref, reactive, watch } from "vue";
export default {
setup() {
let info = ref("lqzww");
watch(info, (newValue, oldValue) => {
console.log(newValue, oldValue);
});
let change = () => {
info.value = "vue3";
};
return {
info,
change,
};
},
};
</script>
|
使 newValue 和 oldValue 都是一个普通对象:
1
2
3
4
5
6
7
8
9
10
11
12
13
14
15
16
17
18
19
20
21
22
23
24
25
| <script>
import { ref, reactive, watch } from "vue";
export default {
setup() {
let info = reactive({ name: "lqzww", age: 18 });
watch(
() => {
return { ...info };
},
(newValue, oldValue) => {
console.log(newValue, oldValue);
}
);
let change = () => {
info.name = "vue3";
};
return {
info,
change,
};
},
};
</script>
|
传入一个 getter 函数:
1
2
3
4
5
6
7
8
9
10
11
12
13
14
15
16
17
18
19
20
21
22
23
24
| <script>
import { ref, reactive, watch } from "vue";
export default {
setup() {
let info = reactive({ name: "lqzww", age: 18 });
watch(
() => info.name,
(newValue, oldValue) => {
console.log(newValue, oldValue);
}
);
let change = () => {
info.name = "vue3";
};
return {
info,
change,
};
},
};
</script>
|
侦听多个数据源
1
2
3
4
5
6
7
8
9
10
11
12
13
14
15
16
17
18
19
20
21
22
23
24
25
26
27
28
29
30
| <template>
<div>
<h2 ref="title">{{info}}</h2>
<button @click="change">change</button>
</div>
</template>
<script>
import { ref, reactive, watch } from "vue";
export default {
setup() {
let info = reactive({ name: "lqzww", age: 18 });
let myName = ref("lqzww");
watch([info, myName], ([newInfo, newName], [oldInfo, oldName]) => {
console.log(newInfo, oldInfo);
console.log(newName, oldName);
});
let change = () => {
info.name = "vue3";
};
return {
info,
change,
};
},
};
</script>
|
侦听响应式对象
1
2
3
4
5
6
7
8
9
10
11
12
13
14
15
16
17
18
19
20
21
22
23
24
25
26
| <script>
import { ref, reactive, watch } from "vue";
export default {
setup() {
let info = reactive({ name: "lqzww", age: 18 });
let myName = ref("lqzww");
watch(
[() => ({ ...info }), myName],
([newInfo, newName], [oldInfo, oldName]) => {
console.log(newInfo, oldInfo);
console.log(newName, oldName);
}
);
let change = () => {
info.name = "vue3";
};
return {
info,
change,
};
},
};
</script>
|
watch选项
如果我们希望侦听一个深层的侦听,那么依然需要设置 deep 为 true;也可以传入 immediate 立即执行。
在这种情况下,是默认进行了深度侦听:
1
2
3
4
5
6
7
8
9
10
11
12
13
14
15
16
17
18
19
20
21
22
23
24
25
26
27
28
29
30
31
32
33
34
| <script>
import { ref, reactive, watch } from "vue";
export default {
setup() {
let info = reactive({
name: "lqzww",
age: 18,
love: {
game: "tlbb",
},
});
watch(
info,
(newInfo, oldInfo) => {
console.log(newInfo, oldInfo);
},
{
deep: true,
immediate: true,
}
);
let change = () => {
info.love.game = "lol";
};
return {
info,
change,
};
},
};
</script>
|
而在下面这种情况就不会默认进行深度侦听,而需要我们去手动设置:
1
2
3
4
5
6
7
8
9
10
11
12
13
14
15
16
17
18
19
20
21
22
23
24
25
26
27
28
29
30
31
32
33
| <script>
import { ref, reactive, watch } from "vue";
export default {
setup() {
let info = reactive({
name: "lqzww",
age: 18,
love: {
game: "tlbb",
},
});
watch(
() => ({ ...info }),
(newInfo, oldInfo) => {
console.log(newInfo, oldInfo);
},
{
deep: true
}
);
let change = () => {
info.love.game = "lol";
};
return {
info,
change,
};
},
};
</script>
|
生命周期钩子
setup 可以用来替代 data、methods、computed、watch 等等选项,也可以替代生命周期钩子。
1
2
3
4
5
6
7
8
9
10
11
12
13
14
15
16
17
18
19
20
21
22
23
24
25
26
27
28
29
30
31
32
33
| <template>
<div>
<h2>{{ name }}</h2>
<button @click="change">change</button>
</div>
</template>
<script>
import { ref, onMounted, onUpdated, onUnmounted } from "vue";
export default {
setup() {
let name = ref("lqzww");
onMounted(() => {
console.log("onMounted");
});
onUpdated(() => {
console.log("onUpdated");
});
onUnmounted(() => {
console.log("onUnmounted");
});
let change = () => {
name.value = "vue3";
};
return {
name,
change,
};
},
};
</script>
|
Provide与Inject
provide 可以传入两个参数:
- name:提供的属性名称;
- value:提供的属性值。
inject 可以传入两个参数:
- 需要 inject 的 property 的 name;
- 默认值。
1
2
3
4
5
6
7
8
9
10
11
12
13
14
15
16
17
18
19
20
21
22
23
24
25
26
27
28
29
30
| // App.vue
<template>
<div>
<home></home>
<button @click="add">+1</button>
{{age}}
</div>
</template>
<script>
import { ref, provide, readonly } from "vue";
import Home from "./components/Home.vue";
export default {
components: { Home },
setup() {
let name = ref("lqzww");
let age = ref(18);
provide("name", readonly(name));
provide("age", readonly(age));
let add = () => {
age.value++;
};
return {
age,
add,
};
},
};
</script>
|
1
2
3
4
5
6
7
8
9
10
11
12
13
14
15
16
17
18
19
20
21
22
23
24
25
26
27
| // Home.vue
<template>
<div>
<h2>{{ name }}</h2>
<h2>{{ age }}</h2>
<button @click="homeAdd">home +1</button>
</div>
</template>
<script>
import { inject } from "vue";
export default {
setup() {
let name = inject("name");
let age = inject("age");
let homeAdd = () => {
age.value++;
};
return {
name,
age,
homeAdd,
};
},
};
</script>
|
注意:在 Vue 中,应该使用单向数据流,应该避免子组件直接修改父组件的值。因此,在使用 provide 的时候,我们可以使用 readonly 来避免。
练习
useCounter
下面我们来看一个简单的计数器案例:
1
2
3
4
5
6
7
8
9
10
11
12
13
14
15
16
17
18
19
20
21
22
23
24
25
26
27
28
| <template>
<div>
<h2>当前计数:{{ counter }}</h2>
<h2>计数*2:{{ doubleCounter }}</h2>
<button @click="increment">+1</button>
<button @click="decrement">-1</button>
</div>
</template>
<script>
import { ref, computed } from "vue";
export default {
setup() {
let counter = ref(0);
let doubleCounter = computed(() => counter.value * 2);
let increment = () => counter.value++;
let decrement = () => counter.value--;
return {
counter,
doubleCounter,
increment,
decrement,
};
},
};
</script>
|
我们可以把上面计数器这个功能封装一个 hooks:
1
2
3
4
5
6
7
8
9
10
11
12
13
14
15
16
17
18
19
20
21
22
23
24
| <template>
<div>
<h2>当前计数:{{ counter }}</h2>
<h2>计数*2:{{ doubleCounter }}</h2>
<button @click="increment">+1</button>
<button @click="decrement">-1</button>
</div>
</template>
<script>
import useCounter from "./hooks/useCounter.js";
export default {
setup() {
const { counter, doubleCounter, increment, decrement } = useCounter();
return {
counter,
doubleCounter,
increment,
decrement,
};
},
};
</script>
|
1
2
3
4
5
6
7
8
9
10
11
12
13
14
15
16
17
|
import { ref, computed } from "vue";
export default function () {
let counter = ref(0);
let doubleCounter = computed(() => counter.value * 2);
let increment = () => counter.value++;
let decrement = () => counter.value--;
return {
counter,
doubleCounter,
increment,
decrement,
}
}
|
useTitle
下面我们就来写一个设置网站 title 的一个hooks:
1
2
3
4
5
6
7
8
9
10
11
12
13
14
15
16
17
18
| <template>
<div></div>
</template>
<script>
import useTitle from "./hooks/useTitle.js";
export default {
setup() {
let titleRef = useTitle("LqZww");
setTimeout(() => {
titleRef.value = "hello vue3";
}, 3000);
return {};
},
};
</script>
|
1
2
3
4
5
6
7
8
9
10
11
12
13
14
|
import { ref, watch } from 'vue'
export default function (title = '默认值') {
let titleRef = ref(title)
watch(titleRef, (newValue) => {
document.title = newValue
}, {
deep: true,
immediate: true
})
return titleRef
}
|
实验性特性
setup顶层编写方式
1
2
3
4
5
6
7
8
9
10
11
| <template>
<div>
<h2>{{ counter }}</h2>
</div>
</template>
<script setup>
import { ref } from "vue";
let counter = ref(0);
</script>
|
更多实验性特性请移步至官网查看。
h函数
认识
在绝大数情况下使用模板来创建 HTML,然后一些特殊的场景,需要 JavaScript 的完全编程的能力,这时候可以使用渲染函数,它比模板更接近编译器:
- vue 在生成真是的 DOM 之前,会将我们的节点转换成 VNode,而 VNode组合在一起形成一颗树结构,就是虚拟 DOM(VDOM);
- 在我们之前编写的 template 中的 HTML,最终也是使用渲染函数生成对应的 VNode;
- 如果我们想要充分利用 JavaScript 的编程能力,我们可以自己来编写 createVNode函数,生成对应的 VNode。
这就需要使用到 h() 函数:
- 它是一个用于创建 vnode 的一个函数;
- 它更准确的命名是
createVNode() 函数,但是为了简便而简化为 h() 函数。
基本使用
它接收三个参数:
- tag:标签的名字,可以传 String、Object、Function,可以是一个标签名、一个组件、一个异步组件或一个函数式组件,并且它是必传的;
- props:对象,可选的,它可以定义class、id等等属性;
- children:可选的,可以传 String、Array、Object。
注意:
- 如果没有 props,那么我们可以将 children 作为第二个参数传入;
- 如果产生歧义,可以给第二个参数传入 null。
1
2
3
4
5
6
7
8
9
| <script>
import { h } from "vue";
export default {
render() {
return h("h2", { class: "className" }, "hello h");
},
};
</script>
|
计数器案例
有如下三种写法:
1
2
3
4
5
6
7
8
9
10
11
12
13
14
15
16
17
18
19
20
21
22
23
| <script>
import { h } from "vue";
export default {
data() {
return {
counter: 0,
};
},
render() {
return h("div", { class: "app" }, [
h("h2", null, `当前计数:${this.counter}`),
h(
"button",
{
onClick: () => this.counter++,
},
"+1"
),
]);
},
};
</script>
|
1
2
3
4
5
6
7
8
9
10
11
12
13
14
15
16
17
18
19
20
21
22
| <script>
import { h, ref } from "vue";
export default {
setup() {
let counter = ref(0);
return { counter };
},
render() {
return h("div", { class: "app" }, [
h("h2", null, `当前计数:${this.counter}`),
h(
"button",
{
onClick: () => this.counter++,
},
"+1"
),
]);
},
};
</script>
|
1
2
3
4
5
6
7
8
9
10
11
12
13
14
15
16
17
18
19
20
21
| <script>
import { h, ref } from "vue";
export default {
setup() {
let counter = ref(0);
return () => {
return h("div", { class: "app" }, [
h("h2", null, `当前计数:${counter.value}`),
h(
"button",
{
onClick: () => counter.value++,
},
"+1"
),
]);
};
},
};
</script>
|
自定义指令
认识
在 Vue 的模板语法中使用过各种指令,比如:v-show、v-for、v-if 等等,除了这些指令之外,我们还可以自定义指令。
在 Vue 中,代码的复用和抽象主要还是通过组件。
在某些情况下,需要对 DOM 元素进行底层操作,这个时候就可以用到自定义指令。
自定义指令又分为两种:
- 自定义局部指令:组件中通过
directives 选项,只能在当前组件中使用;
- 自定义全局指令:app 的
directives 方法,可以在任意组件中使用。
使用
下面我们就来写一个简单的案例,来实现:当某个元素挂载完成后可以自动获取焦点。
方案一:默认的实现方式
1
2
3
4
5
6
7
8
9
10
11
12
13
14
15
16
17
18
19
20
21
22
23
24
25
| <template>
<div>
<input
type="text"
ref="input"
>
</div>
</template>
<script>
import { ref, onMounted } from "vue";
export default {
setup() {
let input = ref(null);
onMounted(() => {
input.value.focus();
});
return {
input,
};
},
};
</script>
|
自定义局部指令
1
2
3
4
5
6
7
8
9
10
11
12
13
14
15
16
17
18
19
20
21
| <template>
<div>
<input
type="text"
v-focus
>
</div>
</template>
<script>
export default {
directives: {
focus: {
mounted(el, bindings, vnode, preVnode) {
console.log(el, bindings, vnode, preVnode);
el.focus();
},
},
},
};
</script>
|
自定义全局指令
1
2
3
4
5
6
7
8
9
10
11
12
13
14
|
import { createApp } from 'vue'
import App from './App.vue'
const app = createApp(App)
app.directive("focus", {
mounted(el, bindings, vnode, preVnode) {
console.log(el, bindings, vnode, preVnode);
el.focus();
},
})
app.mount('#app')
|
指令的生命周期
一个指令定义的对象,提供了如下几个钩子函数:
- created:在绑定元素的 attribute 或事件监听器被应用之前调用;
- beforeMount:当指令第一次绑定到元素并且在挂载父组件之前调用;
- mounted:在绑定元素的父组件被挂载后调用;
- beforeUpdate:在更新包含组件的 VNode 之前调用;
- updated:在包含组件的 VNode 及其子组件的 VNode 更新后调用;
- beforeUnmount:在卸载绑定元素的父组件之前调用;
- unmounted:当指令与元素解除绑定且父组件已卸载时,只调用一次。
1
2
3
4
5
6
7
8
9
10
11
12
13
14
15
16
17
18
19
20
21
22
23
24
25
26
27
28
29
30
31
32
33
34
35
36
37
38
39
40
41
42
43
44
45
46
47
48
49
50
| <template>
<div>
<button
v-lqzww.a.b="counter"
@click="addBtn"
v-if="state"
>当前计数:{{ counter }}</button>
<button @click="showBtn">隐藏/显示计数按钮</button>
</div>
</template>
<script>
import { ref } from "vue";
export default {
directives: {
lqzww: {
created(el, bindings, vnode, preVnode) {
console.log("指令 created", el, bindings, vnode, preVnode);
console.log("counter值:", bindings.value);
console.log("修饰符", bindings.modifiers);
},
beforeMount(el, bindings, vnode, preVnode) {
console.log("指令 beforeMount", el, bindings, vnode, preVnode);
},
mounted(el, bindings, vnode, preVnode) {
console.log("指令 mounted", el, bindings, vnode, preVnode);
},
beforeUpdate(el, bindings, vnode, preVnode) {
console.log("指令 beforeUpdate", el, bindings, vnode, preVnode);
},
updated(el, bindings, vnode, preVnode) {
console.log("指令 update", el, bindings, vnode, preVnode);
},
beforeUnmount(el, bindings, vnode, preVnode) {
console.log("指令 beforeUnmount", el, bindings, vnode, preVnode);
},
unmounted(el, bindings, vnode, preVnode) {
console.log("指令 unmounted", el, bindings, vnode, preVnode);
},
},
},
setup() {
const counter = ref(0);
const state = ref(true);
const addBtn = () => counter.value++;
const showBtn = () => (state.value = !state.value);
return { counter, state, addBtn, showBtn };
},
};
</script>
|
练习
下面我们来写一个指令,格式化时间戳。
1
2
3
4
5
6
7
8
9
10
11
12
13
14
15
16
17
18
19
20
21
22
23
24
25
26
27
28
29
30
31
32
| <template>
<div>
<h2 v-format-time="'YYYY-MM-DD'">{{ timestamp }}</h2>
</div>
</template>
<script>
import dayjs from "dayjs";
export default {
directives: {
"format-time": {
mounted(el, bindings) {
let formatStr = bindings.value;
if (!formatStr) {
formatStr = "YYYY-MM-DD HH:mm:ss";
}
let textContent = el.textContent;
let time;
if (textContent.length === 10) {
time = parseInt(textContent) * 1000;
}
el.textContent = dayjs(time).format(formatStr);
},
},
},
setup() {
const timestamp = 1661597338;
return { timestamp };
},
};
</script>
|
这里我们用到了 Day.js
Teleport
在组件化开发中,我们有个组件A,在另外一个组件B中使用,那么组件A的 template 的元素会被挂载到组件B的 template 的某个位置。
但是在某些情况下,我们希望组件不是挂载在这个组件树上,而是移动的 Vue app 之外的某个地方,这个时候就需要通过 teleport 来完成。
它是 Vue 的一个内置组件,它有两个属性:
- to:指定将其中的内容移动到的目标元素,可以使用选择器;
- disabled:是否禁用 teleport 的功能。
1
2
3
4
5
6
7
8
|
<template>
<div class="app">
<teleport to='#app'>
<h2>hello</h2>
</teleport>
</div>
</template>
|
我们会发现在浏览器里是这样:
1
2
3
4
5
6
7
| <div id="app" data-v-app="">
<h2>hello</h2>
<div class="app">
</div>
</div>
|
如果有多个 teleport,那最后会进行合并。
Vue插件
通常我们向 Vue 全局添加一些功能时,会采用插件的模式,它有如下两种编写方式:
- 对象类型:一个对象,但是必须包含一个
install 的函数,该函数会在安装插件时执行;
- 函数类型:一个
function,这个函数会在安装插件时自动执行。
插件可以完成的功能是没有限制的,比如以下几种都可以实现:
- 添加全局方法或者 property,通过把它们添加到 config.globalProperties 上实现;
- 添加全局资源:指令 / 过滤器 / 过渡等等;
- 通过全局 mixin 来添加一些组件选项;
- 一个库,提供自己的 API,同时提供上面提到的一个或多个功能;
对象类型
我们在对象类型中定义一个字段并尝试获取。
在 src 目录下新建 plugins 目录,并新建 plugins_object.js 文件。
1
2
3
4
5
6
|
export default {
install(app) {
app.config.globalProperties.$name = 'LqZww'
}
}
|
在 main.js 中引入:
1
2
3
4
5
6
7
8
9
10
| import { createApp } from 'vue'
import App from './App.vue'
import pluginsObject from './plugins/plugins_object'
const app = createApp(App)
app.use(pluginsObject)
app.mount('#app')
|
我们先在 App.vue 中尝试获取:
1
2
3
4
5
6
7
8
9
10
11
12
13
14
15
16
17
18
19
| <template>
<div class="app"></div>
</template>
<script>
import { getCurrentInstance } from "vue";
export default {
setup() {
const instance = getCurrentInstance();
console.log(
"setup 获取",
instance.appContext.config.globalProperties.$name
);
},
mounted() {
console.log("mounted 获取", this.$name);
},
};
</script>
|
函数类型
在 src -> plugins 目录下新建 plugins_function.js 文件。
1
2
3
| export default function (app) {
console.log(app);
}
|
在 main.js 中引入:
1
2
3
4
5
6
7
8
9
10
| import { createApp } from 'vue'
import App from './App.vue'
import pluginsFunction from './plugins/plugins_function'
const app = createApp(App)
app.use(pluginsFunction)
app.mount('#app')
|
Vue3源码
Vue 源码包含了三大核心:
- Compiler模块:编译模板系统;
- Runtime模块:也成为 Renderer 模块,真正渲染的模块;
- Reactivity模块:响应式系统。
实现Mini-Vue
我们实现一个简洁版的 Mini-Vue 框架,该 Vue 包含三个模块:
- 渲染系统模块;
- 可响应式系统模块;
- 应用程序入口模块;
渲染系统实现
渲染系统主要包含三个功能:
- h 函数:用于返回一个 VNode 对象;
- mount 函数:用于将 VNode 挂载到 DOM 上;
- patch 函数:用于对两个 VNode 进行对比,决定如何处理新的 VNode。
h函数实现
1
2
3
4
5
6
7
8
9
10
11
12
13
14
15
16
17
18
19
20
21
22
23
24
25
26
27
|
<!DOCTYPE html>
<html lang="en">
<head>
<meta charset="UTF-8">
<meta http-equiv="X-UA-Compatible" content="IE=edge">
<meta name="viewport" content="width=device-width, initial-scale=1.0">
<title>Document</title>
</head>
<body>
<div id="app"></div>
<script src="./renderer.js"></script>
<script>
const vnode = h("div", { class: 'lqzww' }, [
h('h2', null, "当前计数:0"),
h('button', null, '+1')
])
</script>
</body>
</html>
|
1
2
3
4
5
6
7
8
|
const h = (tag, props, children) => {
return {
tag,
props,
children
}
}
|
mount函数实现
1
2
3
4
5
6
7
8
9
10
11
12
13
14
15
16
17
18
19
20
21
22
23
24
25
26
27
28
29
30
31
|
<!DOCTYPE html>
<html lang="en">
<head>
<meta charset="UTF-8">
<meta http-equiv="X-UA-Compatible" content="IE=edge">
<meta name="viewport" content="width=device-width, initial-scale=1.0">
<title>Document</title>
</head>
<body>
<div id="app"></div>
<script src="./renderer.js"></script>
<script>
const vnode = h("div", { class: 'lqzww' }, [
h('h2', null, "当前计数:0"),
h('button', null, '+1')
])
mount(vnode, document.querySelector('#app'))
</script>
</body>
</html>
|
1
2
3
4
5
6
7
8
9
10
11
12
13
14
15
16
17
18
19
20
21
22
23
24
25
26
27
28
29
30
31
32
33
34
35
36
37
38
39
40
41
42
43
|
const h = (tag, props, children) => {
return {
tag,
props,
children
}
}
const mount = (vnode, container) => {
const el = vnode.el = document.createElement(vnode.tag)
if (vnode.props) {
for (const key in vnode.props) {
const value = vnode.props[key]
if (key.startsWith('on')) {
el.addEventListener(key.slice(2).toLowerCase(), value)
} else {
el.setAttribute(key, value)
}
}
}
if (vnode.children) {
if (typeof vnode.children === 'string') {
el.textContent = vnode.children
} else {
vnode.children.forEach(item => {
mount(item, el)
})
}
}
container.appendChild(el)
}
|
patch函数实现
1
2
3
4
5
6
7
8
9
10
11
12
13
14
15
16
17
18
19
20
21
22
23
24
25
26
27
28
29
30
31
32
33
34
35
36
37
38
| <!DOCTYPE html>
<html lang="en">
<head>
<meta charset="UTF-8">
<meta http-equiv="X-UA-Compatible" content="IE=edge">
<meta name="viewport" content="width=device-width, initial-scale=1.0">
<title>Document</title>
</head>
<body>
<div id="app"></div>
<script src="./renderer.js"></script>
<script>
const vnode = h("div", { id: "id", class: 'lqzww', name: "hhh" }, [
h('h2', null, "当前计数:10"),
h('button', null, '+1')
])
mount(vnode, document.querySelector('#app'))
setTimeout(() => {
const newVNode = h('div', { id: "id", class: 'zww', name: "hhh" }, [
h('h2', null, "哈哈哈"),
h('button', null, '+111111')
])
patch(vnode, newVNode)
}, 2000)
</script>
</body>
</html>
|
1
2
3
4
5
6
7
8
9
10
11
12
13
14
15
16
17
18
19
20
21
22
23
24
25
26
27
28
29
30
31
32
33
34
35
36
37
38
39
40
41
42
43
44
45
46
47
48
49
50
51
52
53
54
55
56
57
58
59
60
61
62
63
64
65
66
67
68
69
70
71
72
73
74
75
76
77
78
79
80
81
82
83
84
85
86
87
88
89
90
91
92
93
94
95
96
97
98
99
100
101
102
103
104
105
106
107
108
109
110
111
112
113
114
115
116
117
118
119
120
121
122
123
124
125
126
127
|
const h = (tag, props, children) => {
return {
tag,
props,
children
}
}
const mount = (vnode, container) => {
const el = vnode.el = document.createElement(vnode.tag)
if (vnode.props) {
for (const key in vnode.props) {
const value = vnode.props[key]
if (key.startsWith('on')) {
el.addEventListener(key.slice(2).toLowerCase(), value)
} else {
el.setAttribute(key, value)
}
}
}
if (vnode.children) {
if (typeof vnode.children === 'string') {
el.textContent = vnode.children
} else {
vnode.children.forEach(item => {
mount(item, el)
})
}
}
container.appendChild(el)
}
const patch = (n1, n2) => {
if (n1.tag != n2.tag) {
const n1ElParent = n1.el.parentElement
n1ElParent.removeChild(n1.el)
mount(n2, n1ElParent)
} else {
const el = n2.el = n1.el
const oldProps = n1.props || {}
const newProps = n2.props || {}
for (const key in newProps) {
const oldValue = oldProps[key]
const newValue = newProps[key]
if (oldValue != newValue) {
if (key.startsWith('on')) {
el.addEventListener(key.slice(2).toLowerCase(), newValue)
} else {
el.setAttribute(key, newValue)
}
}
}
for (const key in oldProps) {
if (key.startsWith('on')) {
const value = oldProps[key]
el.removeEventListener(key.slice(2).toLowerCase(), value)
}
if (!(key in newProps)) {
el.removeAttribute(key)
}
}
const oldChildren = n1.children || []
const newChildren = n2.children || []
if (typeof newChildren === 'string') {
if (typeof oldChildren === 'string') {
if (newChildren !== oldChildren) {
el.textContent = newChildren
}
} else {
el.innerHTML = newChildren
}
} else {
if (typeof oldChildren === 'string') {
el.innerHTML = ''
newChildren.forEach(item => {
mount(item, el)
})
} else {
const commonLength = Math.min(oldChildren.length, newChildren.length)
for (let i = 0; i < commonLength; i++) {
patch(oldChildren[i], newChildren[i])
}
if (newChildren.length > oldChildren.length) {
newChildren.slice(oldChildren.length).forEach(item => {
mount(item, el)
})
}
if (newChildren.length < oldChildren.length) {
oldChildren.slice(newChildren.length).forEach(item => {
el.removeChild(item.el)
})
}
}
}
}
}
|
响应式系统实现
1
2
3
4
5
6
7
8
9
10
11
12
13
14
15
16
17
18
19
20
21
22
23
24
25
26
27
28
29
30
31
32
33
34
35
36
37
38
39
40
41
42
43
44
45
46
47
48
49
50
51
52
53
54
55
56
57
58
59
60
61
62
63
64
65
66
67
68
69
70
71
72
73
74
75
76
77
78
79
80
81
82
83
84
85
86
87
88
89
90
91
92
93
94
95
96
97
98
|
class Dep {
constructor() {
this.subscriber = new Set()
}
depend() {
if (activeEffect) {
this.subscriber.add(activeEffect)
}
}
notify() {
this.subscriber.forEach(effect => {
effect()
})
}
}
let activeEffect = null
function watchEffect(effect) {
activeEffect = effect
dep.depend()
effect()
activeEffect = null
}
const targetMap = new WeakMap()
function getDep(target, key) {
let depsMap = targetMap.get(target)
if (!depsMap) {
depsMap = new Map()
targetMap.set(target, depsMap)
}
let dep = depsMap.get(key)
if (!dep) {
dep = new Dep()
depsMap.set(key, dep)
}
return dep
}
function reactive(raw) {
return new Proxy(raw, {
get(target, key) {
const dep = getDep(target, key)
dep.depend()
return target[key]
},
set(target, key, newValue) {
const dep = getDep(target, key)
target[key] = newValue
dep.notify()
}
})
}
const info = reactive({
counter: 100,
name: 'lqzww'
})
const dep = new Dep()
watchEffect(function () {
console.log('effect1', info.counter * 2, info.name);
})
watchEffect(function () {
console.log('effect2', info.counter + 2);
})
info.counter++
info.name = 'hhhh'
|
Mini-Vue实现
1
2
3
4
5
6
7
8
9
10
11
12
13
14
15
16
17
18
19
20
21
22
23
24
25
26
27
28
29
30
31
32
33
34
35
36
37
38
39
40
41
42
43
| <!DOCTYPE html>
<html lang="en">
<head>
<meta charset="UTF-8">
<meta http-equiv="X-UA-Compatible" content="IE=edge">
<meta name="viewport" content="width=device-width, initial-scale=1.0">
<title>Document</title>
</head>
<body>
<div id="app"></div>
<script src="./renderer.js"></script>
<script src="./reactive.js"></script>
<script src="./index.js"></script>
<script>
const App = {
data: reactive({
counter: 0
}),
render() {
return h("div", null, [
h('h2', null, `当前计数:${this.data.counter}`),
h('button', {
onclick: () => {
this.data.counter++
}
}, "+1")
])
}
}
const app = createApp(App)
app.mount('#app')
</script>
</body>
</html>
|
1
2
3
4
5
6
7
8
9
10
11
12
13
14
15
16
17
18
19
20
21
22
|
function createApp(rootComponent) {
return {
mount(selector) {
const container = document.querySelector(selector)
let isMouned = false
let oldVNode = null
watchEffect(() => {
if (!isMouned) {
oldVNode = rootComponent.render()
mount(oldVNode, container)
isMouned = true
} else {
const newVNode = rootComponent.render()
patch(oldVNode, newVNode)
oldVNode = newVNode
}
})
}
}
}
|
Vue-Router
安装
1
2
| # 安装 4x 版本
npm install vue-router@4
|
我们也可以通过脚手架安装好 vue-router。
基本使用
首先在 views 下创建两个文件:Home.vue、About.vue。
1
2
3
4
5
6
| // Home.vue
<template>
<div>
<h2>home</h2>
</div>
</template>
|
1
2
3
4
5
6
| // About.vue
<template>
<div>
<h2>about</h2>
</div>
</template>
|
然后在 src 下创建 router 文件夹,并创建 index.js 文件。
1
2
3
4
5
6
7
8
9
10
11
12
13
14
15
16
17
18
19
20
21
22
23
24
| import { createRouter, createWebHashHistory, createWebHistory } from 'vue-router'
import Home from '../views/Home.vue'
import About from '../views/About.vue'
const routes = [
{
path: "/home",
component: Home
},
{
path: "/about",
component: About
}
]
const router = createRouter({
routes,
history: createWebHistory()
})
export default router
|
然后在 main.js 引入路由:
1
2
3
4
5
6
7
8
9
10
| import { createApp } from 'vue'
import router from './router'
import App from './App.vue'
createApp(App).use(router).mount('#app')
|
最后在 App.vue 中使用:
1
2
3
4
5
6
7
8
9
| <template>
<div class="app">
<div>app</div>
<router-link to="/home">首页</router-link>
<router-link to="/about">关于</router-link>
<router-view></router-view>
</div>
</template>
|
注意:
当我们直接访问 http://localhost:8080/ 的时候,会发现控制台有如下警告:
1
| [Vue Router warn]: No match found for location with path "/"
|
我们可以配置重定向跳转至 /home:
1
2
3
4
5
6
7
8
9
10
11
12
13
14
| const routes = [
{
path: "/",
redirect: '/home'
},
{
path: "/home",
component: Home
},
{
path: "/about",
component: About
}
]
|
router-link
它有如下属性可以进行配置:
- to:可以是一个字符串或者对象;
- replace:设置后,当被点击后,会调用
router.replace(),而不是 router.push();
- active-class:设置被激活后应用的 class,默认是
router-link-active;
- exact-active-class:链接精准激活时,应用于渲染
<a> 的 class,默认是 router-link-exact-active。
注意:Vue2 中 tag 属性,在 vue-router@4 版本中已失效。
路由懒加载
当我们打包构建应用时,JavaScript 包会随着更新越来越大,从而影响页面的加载。
如果我们能把不同路由对应的组件分割成不同的代码块,然后当路由被访问的时候才加载对应的组件,这样就会提高效率,也可以提高首屏的渲染效率。
Vue Router 默认支持动态的导入组件,component 可以传入一个组件,也可以接收一个函数,并且该函数需要返回一个 Promise,而 import 函数返回的就是一个 Promise。
1
2
3
4
5
6
7
8
9
10
11
12
13
14
| const routes = [
{
path: "/",
redirect: '/home'
},
{
path: "/home",
component: () => import("../views/Home.vue")
},
{
path: "/about",
component: () => import("../views/About.vue")
}
]
|
动态路由匹配
我们先在 router -> index.js 添加动态路由:
1
2
3
4
5
6
7
| const routes = [
{
path: "/user/:name",
name: "user",
component: () => import("../views/User.vue")
}
]
|
然后在 User.vue 文件下可以获取到参数:
1
2
3
4
5
6
7
8
9
10
11
12
13
14
15
| <template>
<div>
<h2>user:{{ $route.params.name }}</h2>
</div>
</template>
<script>
import { useRoute } from "vue-router";
export default {
setup() {
const route = useRoute();
console.log(route.params.name);
},
};
</script>
|
NotFound
1
2
3
4
5
6
7
| const routes = [
{
path: "/:pathMatch(.*)",
name: 'NotFound',
component: () => import("../views/NotFound.vue")
}
]
|
我们也可以在 NotFound.vue 页面中来获取参数:
1
2
3
4
5
6
| <template>
<div>
<h2>not found</h2>
<h1>{{ $route.params.pathMatch }}</h1>
</div>
</template>
|
除了上面这种写法,还有另外一种,就是在匹配规则后面多加了个 *:
1
2
3
4
5
6
7
| const routes = [
{
path: "/:pathMatch(.*)*",
name: 'NotFound',
component: () => import("../views/NotFound.vue")
}
]
|
它们的区别在于解析的时候,$route.params.pathMatch 是否解析了 /:
如果路径为:http://localhost:8080/aaa/bbb/ccc
/:pathMatch(.*) 解析为:aaa/bbb/ccc;/:pathMatch(.*)* 解析为:[ "aaa", "bbb", "ccc" ]。
路由的嵌套
现在我们在 home 页面下添加两个组件:HomeMessage、HomeShops。
1
2
3
4
5
6
7
8
9
10
11
12
13
14
15
16
17
18
19
20
21
22
23
|
const routes = [
{
path: "/home",
name: "home",
component: () => import("../views/Home.vue"),
meta: {},
children: [
{
path: "",
redirect: "/home/message"
},
{
path: "message",
component: () => import("../views/HomeMessage.vue")
},
{
path: "shops",
component: () => import("../views/HomeShops.vue")
}
]
}
]
|
1
2
3
4
5
6
7
8
9
10
11
|
<template>
<div>
<h2>home</h2>
<router-link to="/home/message">消息</router-link>
<router-link to="/home/shops">商品</router-link>
<router-view></router-view>
</div>
</template>
|
编程式导航
1
2
3
4
5
6
7
8
9
10
11
12
| <template>
<div class="app">
<div>app</div>
<router-link to="/home">首页</router-link>
<router-link to="/about">关于</router-link>
<router-link to="/user/lqzww">用户</router-link>
<button @click="goAbout">关于</button>
<router-view></router-view>
</div>
</template>
|
1
2
3
4
5
6
7
8
9
10
11
12
13
14
15
16
17
18
19
20
| import { useRouter } from "vue-router";
export default {
setup() {
const router = useRouter();
const goAbout = () => {
router.push({
path: "/about",
query: {
name: "lqzww",
},
});
};
return {
goAbout,
};
},
};
|
router-link的v-slot
在 vue-router@3 的时候,有一个 tag 属性,可以决定到底渲染成什么元素。但在 @4 版本后,该属性就被移除了,而是使用 v-slot 的方式来渲染。
如果我们需要整个元素都自定义,那么需要使用 custom 属性。如果不写,那么自定义的内容会被包裹在一个 a 元素当中。
我们使用 v-slot 作用域插槽来获取内部传给我们的值:
- href:解析后的 url;
- route:解析后的 route 对象;
- navigate:触发导航的函数;
- isActive:是否匹配的状态;
- isExactActive:是否精准匹配的状态。
1
2
3
4
5
6
7
8
9
| <router-link
to="/home"
v-slot="props"
custom
>
<button @click="props.navigate">{{props.href}}</button>
<span>{{props.isActive}}</span>
<span>{{props.isExactActive}}</span>
</router-link>
|
router-view的v-slot
router-view 它也提供给我们一个插槽,可以用于 <transition> 和 <keep-alive> 组件来包裹路由组件。
- Component:要渲染的组件;
- route:解析出的标准化路由对象。
1
2
3
4
5
6
7
| <router-view v-slot="props">
<transition name="lqzww">
<keep-alive>
<component :is="props.Component"></component>
</keep-alive>
</transition>
</router-view>
|
1
2
3
4
5
6
7
8
9
10
11
12
13
| .lqzww-active {
color: red;
}
.lqzww-enter-from,
.lqzww-leave-to {
opacity: 0;
}
.lqzww-enter-active,
.lqzww-leave-active {
transition: opacity 1s ease;
}
|
当我们切换路由时就会展示动画效果。
动态添加路由
我们可以使用 addRoute 来动态添加路由。
1
2
3
4
5
6
7
8
9
10
11
12
13
14
15
16
17
18
19
20
21
22
23
24
25
26
27
28
29
30
31
32
33
34
35
36
37
38
39
40
41
42
43
44
45
46
47
48
49
50
51
52
| import { createRouter, createWebHistory } from 'vue-router'
const routes = [
{
path: "/",
redirect: '/home'
},
{
path: "/home",
name: "home",
component: () => import("../views/Home.vue"),
meta: {},
children: [
{
path: "",
redirect: "/home/message"
},
{
path: "message",
name: "homeMessage",
component: () => import("../views/HomeMessage.vue")
},
{
path: "shops",
name: "homeShops",
component: () => import("../views/HomeShops.vue")
}
]
}
]
const router = createRouter({
routes,
history: createWebHistory()
})
const categoryRoute = {
path: "/category",
component: () => import("../views/Category.vue")
}
router.addRoute(categoryRoute)
router.addRoute("home", {
path: "moment",
component: () => import("../views/HomeMoment.vue")
})
export default router
|
动态删除路由
删除路由的方式有如下三种方式:
- 使用
addRoute 添加一个 name 相同的路由,这样会把旧路由替换掉;
- 使用
removeRoute 删除,传入路由的 name 名称;
- 使用
addRoute 方法的返回值回调;
1
2
3
4
5
6
7
8
9
10
11
12
13
14
15
16
17
18
19
20
21
22
| 1.
router.addRoute({
path: "/about",
name: "about",
component: () => import("../views/About.vue")
})
router.addRoute({
path: "/category",
name: "about",
component: () => import("../views/Category.vue")
})
2.
router.removeRoute("about")
3.
const categoryRoute = {
path: "/category",
component: () => import("../views/Category.vue")
}
const removeRoute = router.addRoute(categoryRoute)
removeRoute()
|
路由其他方法
router.hasRoute():检查路由是否存在;router.getRoutes():获取一个包含所有路由记录的数组;
路由导航守卫
vue-router 提供的导航守卫主要用来通过跳转或取消的方式守卫导航。
全局的前置守卫 beforeEach 会在导航触发时被调用。
1
2
3
4
5
6
7
8
9
10
11
12
13
14
| router.beforeEach((to, from) => {
console.log('即将跳转到的route对象:', to);
console.log('从哪一个路由对象导航来的:', from);
if (to.path.indexOf('/home') !== -1) {
return '/about'
}
})
|
在 Vue2 中,我们是通过 next 函数来决定如何进行跳转的。但是在 Vue3 中,我们需要通过返回值来进行控制。
更多导航守卫请参考Vue Router 官网
Vuex
安装
基本使用
在 src 目录下新建 store -> index.js:
1
2
3
4
5
6
7
8
9
10
11
12
13
14
15
16
17
| import { createStore } from 'vuex'
const store = createStore({
state() {
return {
counter: 0
}
},
mutations: {
increment(state) {
console.log(state);
state.counter++
}
}
})
export default store
|
在 main.js 中引入:
1
2
3
4
5
6
| import { createApp } from 'vue'
import router from './router'
import store from './store'
import App from './App.vue'
createApp(App).use(router).use(store).mount('#app')
|
然后我们在 App.vue 中来使用:
1
2
3
4
5
6
7
8
9
10
11
12
13
14
15
16
17
18
19
20
21
22
| <template>
<div class="app">
<h2>{{ $store.state.counter }}</h2>
<button @click="increment">+1</button>
</div>
</template>
<script>
import { useStore } from "vuex";
export default {
setup() {
const store = useStore();
const increment = () => {
store.commit("increment");
};
return {
increment,
};
},
};
</script>
|
单一状态树
Vuex 使用单一状态树:
- 用一个对象就包含了全部的应用层级的状态;
- 采用的是 SSOT,Single Source of Truth,也可以翻译成单一数据源;
- 每个应用将仅仅包含一个 store 实例;
- 单状态树和模块化并不冲突;
state
computed中使用
1
2
3
4
5
6
7
8
9
| <template>
<div class="app">
<h2>{{ $store.state.counter }}</h2>
<h2>{{ aCounter }}</h2>
<h2>{{ sName }}</h2>
<h2>{{ sAge }}</h2>
<button @click="increment">+1</button>
</div>
</template>
|
1
2
3
4
5
6
7
8
9
10
11
12
13
14
15
16
17
18
19
20
21
22
23
| import { useStore, mapState } from "vuex";
export default {
computed: {
aCounter() {
return this.$store.state.counter;
},
...mapState({
sName: (state) => state.name,
sAge: (state) => state.age,
}),
},
setup() {
const store = useStore();
const increment = () => {
store.commit("increment");
};
return {
increment,
};
},
};
|
setup中使用
1
2
3
4
5
6
7
8
9
| <template>
<div class="app">
<h2>{{ $store.state.counter }}</h2>
<h2>{{ sCounter }}</h2>
<h2>{{ name }}</h2>
<h2>{{ age }}</h2>
<button @click="increment">+1</button>
</div>
</template>
|
1
2
3
4
5
6
7
8
9
10
11
12
13
14
15
16
17
18
19
20
21
22
23
24
25
26
| import { computed } from "vue";
import { useStore, mapState } from "vuex";
export default {
setup() {
const store = useStore();
const increment = () => {
store.commit("increment");
};
const sCounter = computed(() => store.state.counter);
const storeStateFns = mapState(["name", "age"]);
const storeState = {};
Object.keys(storeStateFns).forEach((fnkey) => {
const fn = storeStateFns[fnkey].bind({ $store: store });
storeState[fnkey] = computed(fn);
});
return {
increment,
sCounter,
...storeState,
};
},
};
|
useState的封装
我们新建 src -> hooks -> useState.js 文件。
1
2
3
4
5
6
7
8
9
10
11
12
13
14
15
16
|
import { computed } from "vue";
import { mapState, useStore } from "vuex";
export function useState(mapper) {
const store = useStore()
const storeStateFns = mapState(mapper);
const storeState = {};
Object.keys(storeStateFns).forEach((fnkey) => {
const fn = storeStateFns[fnkey].bind({ $store: store });
storeState[fnkey] = computed(fn);
});
return storeState
}
|
使用:
1
2
3
4
5
6
7
8
9
10
11
12
| <template>
<div class="app">
<h2>{{ $store.state.counter }}</h2>
<h2>{{ counter }}</h2>
<h2>{{ name }}</h2>
<h2>{{ age }}</h2>
<hr />
<h2>{{ sCounter }}</h2>
<h2>{{ sName }}</h2>
<h2>{{ sAge }}</h2>
</div>
</template>
|
1
2
3
4
5
6
7
8
9
10
11
12
13
14
15
16
| import { useState } from "./hooks/useState";
export default {
setup() {
const storeState = useState(["counter", "name", "age"]);
const storeState2 = useState({
sCounter: (state) => state.counter,
sName: (state) => state.name,
sAge: (state) => state.age,
});
return {
...storeState,
...storeState2,
};
},
};
|
getter
使用
1
2
3
4
5
6
7
8
9
10
11
12
13
14
15
16
17
18
19
20
21
22
23
24
25
26
27
28
29
30
31
32
33
34
35
36
37
38
39
40
41
42
43
44
45
46
47
48
49
|
import { createStore } from 'vuex'
const store = createStore({
state() {
return {
counter: 0,
name: "LqZww",
age: 18,
books: [
{ name: "book1", count: 1, price: 10 },
{ name: "book2", count: 3, price: 6 },
{ name: "book3", count: 6, price: 12 },
],
discount: 0.5
}
},
mutations: {
increment(state) {
console.log(state);
state.counter++
}
},
getters: {
totalPrice(state, getters) {
let totalPrice = 0
for (const book of state.books) {
totalPrice += book.count * book.price
}
return totalPrice * getters.currentDiscount
},
currentDiscount(state) {
return state.discount * 0.9
},
totalPriceCountGreaterN(state, getters) {
return function (n) {
let totalPrice = 0
for (const book of state.books) {
if (book.count > n) {
totalPrice += book.count * book.price
}
}
return totalPrice * getters.currentDiscount
}
}
}
})
export default store
|
1
2
3
4
5
6
7
8
|
<template>
<div class="app">
<h2>{{ $store.getters.totalPrice }}</h2>
<h2>{{ $store.getters.currentDiscount }}</h2>
<h2>{{ $store.getters.totalPriceCountGreaterN(5) }}</h2>
</div>
</template>
|
computed中使用
1
2
3
4
5
6
7
8
9
10
11
12
| <template>
<div class="app">
<h2>{{ $store.getters.totalPrice }}</h2>
<h2>{{ $store.getters.currentDiscount }}</h2>
<h2>{{ $store.getters.totalPriceCountGreaterN(5) }}</h2>
<hr />
<h2>{{ totalPrice }}</h2>
<h2>{{ currentDiscount }}</h2>
<h2>{{ sTotalPrice }}</h2>
<h2>{{ sCurrentDiscount }}</h2>
</div>
</template>
|
1
2
3
4
5
6
7
8
9
10
| import { mapGetters } from "vuex";
export default {
computed: {
...mapGetters(["totalPrice", "currentDiscount"]),
...mapGetters({
sTotalPrice: "totalPrice",
sCurrentDiscount: "currentDiscount",
}),
},
};
|
setup中使用
它与 state 的使用差不多,我们也把它进行封装下使用:
新建 src -> hooks -> useGetters.js 文件。
1
2
3
4
5
6
7
8
9
10
11
12
13
14
15
16
|
import { computed } from "vue";
import { mapGetters, useStore } from "vuex";
export function useGetters(mapper) {
const store = useStore()
const storeStateFns = mapGetters(mapper);
const storeState = {};
Object.keys(storeStateFns).forEach((fnkey) => {
const fn = storeStateFns[fnkey].bind({ $store: store });
storeState[fnkey] = computed(fn);
});
return storeState
}
|
使用:
1
2
3
4
5
6
7
8
9
10
11
| <template>
<div class="app">
<h2>{{ $store.getters.totalPrice }}</h2>
<h2>{{ $store.getters.currentDiscount }}</h2>
<h2>{{ $store.getters.totalPriceCountGreaterN(5) }}</h2>
<hr />
<h2>{{ totalPrice }}</h2>
<h2>{{ currentDiscount }}</h2>
<hr />
</div>
</template>
|
1
2
3
4
5
6
7
8
9
| import { useGetters } from "./hooks/useGetters";
export default {
setup() {
const storeGetters = useGetters(["totalPrice", "currentDiscount"]);
return {
...storeGetters,
};
},
};
|
useState与useGetters封装
我们会发现 useState 与 useGetters 的代码其实差不多,我们还可以进行如下的封装:
新建文件:src -> hooks -> useMapper.js
1
2
3
4
5
6
7
8
9
10
11
12
13
14
15
16
|
import { computed } from "vue";
import { useStore } from "vuex";
export function useMapper(mapper, mapFun) {
const store = useStore()
const storeStateFns = mapFun(mapper);
const storeState = {};
Object.keys(storeStateFns).forEach((fnkey) => {
const fn = storeStateFns[fnkey].bind({ $store: store });
storeState[fnkey] = computed(fn);
});
return storeState
}
|
1
2
3
4
5
6
7
|
import { mapState } from "vuex";
import { useMapper } from "./useMapper";
export function useGetters(mapper) {
return useMapper(mapper, mapState)
}
|
1
2
3
4
5
6
7
|
import { mapGetters } from "vuex";
import { useMapper } from "./useMapper";
export function useGetters(mapper) {
return useMapper(mapper, mapGetters)
}
|
1
2
3
4
5
6
7
8
|
import { useState } from './useState'
import { useGetters } from './useGetters'
export {
useState,
useGetters
}
|
mutation
传参的使用
1
2
3
4
5
6
7
8
9
10
11
12
13
14
15
16
17
18
19
20
|
import { createStore } from 'vuex'
const store = createStore({
state() {
return {
counter: 0
}
},
mutations: {
increment(state) {
state.counter++
},
incrementN(state, payload) {
state.counter += payload
}
},
})
export default store
|
1
2
3
4
5
6
7
8
9
10
11
12
13
14
15
16
17
18
19
20
21
22
23
24
25
26
27
28
29
30
| <template>
<div class="app">
<h2>{{ $store.state.counter }}</h2>
<button @click="increment">+1</button>
<button @click="$store.commit('increment')">+1</button>
<button @click="$store.commit('incrementN', 10)">+10</button>
</div>
</template>
<script>
import { useStore } from "vuex";
export default {
setup() {
const store = useStore();
const increment = () => {
store.commit("increment");
};
return {
increment,
};
},
};
</script>
|
mutation的辅助函数
methods 中使用:
1
2
3
4
5
6
7
8
9
10
11
12
13
14
15
16
17
18
19
20
21
| <template>
<div class="app">
<h2>{{ $store.state.counter }}</h2>
<button @click="increment">+1</button>
<button @click="add">+1</button>
<button @click="$store.commit('increment')">+1</button>
<button @click="$store.commit('incrementN', 10)">+10</button>
</div>
</template>
<script>
import { mapMutations } from "vuex";
export default {
methods: {
...mapMutations(["increment"]),
...mapMutations({
add: "increment",
}),
},
};
</script>
|
setup 中使用:
1
2
3
4
5
6
7
8
9
10
11
12
13
14
| import { mapMutations } from "vuex";
export default {
setup() {
const storeMutations = mapMutations(["increment"]);
const storeMutations2 = mapMutations({
add: "increment",
});
return {
...storeMutations,
...storeMutations2,
};
},
};
|
actions
action 类似于 mutation,不同点在于:
- action 提交的是 mutation,而不是直接变更状态;
- action 可以包含任意的异步操作;
基本使用
1
2
3
4
5
6
7
8
9
10
11
12
13
14
15
16
17
18
| const store = createStore({
mutations: {
increment(state) {
state.counter++
},
incrementN(state, payload) {
state.counter += payload
}
},
actions: {
incrementAction(context) {
setTimeout(() => {
context.commit('increment')
}, 1000)
}
}
})
|
1
2
3
4
5
6
7
8
9
10
11
12
13
14
15
16
| <template>
<div class="app">
<h2>{{ $store.state.counter }}</h2>
<button @click="increment">+1</button>
</div>
</template>
<script>
export default {
methods: {
increment() {
this.$store.dispatch("incrementAction");
},
},
};
</script>
|
actions 的辅助函数使用方法于 mutation 一样,这里就不多作介绍了。
返回promise
如果我们想要在 actions 执行完后去执行其他东西,我们可以在里面使用 promise。
1
2
3
4
5
6
7
8
9
10
11
12
13
14
15
16
17
| import { createStore } from 'vuex'
const store = createStore({
actions: {
incrementAction(context) {
return new Promise((resolve, reject) => {
setTimeout(() => {
context.commit('increment')
resolve('success')
}, 1000)
})
}
}
})
export default store
|
1
2
3
4
5
6
7
8
9
10
11
12
13
14
15
16
17
18
| import { onMounted } from "vue";
import { useStore } from "vuex";
export default {
setup() {
const store = useStore();
onMounted(() => {
store
.dispatch("incrementAction")
.then((res) => {
console.log(res);
})
.catch((err) => {
console.log(err);
});
});
},
};
|
module
基本使用
我们先在 store 文件夹下新建 modules 文件夹,并在下面新建 user.js 与 system.js 文件。
1
2
3
4
5
6
7
8
9
10
11
12
13
|
const userModule = {
state() {
return {
userCounter: 10
}
},
getters: {},
mutations: {},
actions: {},
}
export default userModule
|
1
2
3
4
5
6
7
8
9
10
11
12
13
|
const systemModule = {
state() {
return {
systemCounter: 20,
}
},
getters: {},
mutations: {},
actions: {},
}
export default systemModule
|
然后在 store -> index.js 中引入:
1
2
3
4
5
6
7
8
9
10
11
12
13
14
15
16
17
18
19
| import { createStore } from 'vuex'
import userModule from './modules/user'
import systemModule from './modules/system'
const store = createStore({
state() {
return {
counter: 1
}
},
modules: {
user: userModule,
system: systemModule
}
})
export default store
|
使用:
1
2
3
4
5
6
7
| <template>
<div class="app">
<h2>counter:{{ $store.state.counter }}</h2>
<h2>userCounter:{{ $store.state.user.userCounter }}</h2>
<h2>systemCounter:{{ $store.state.system.systemCounter }}</h2>
</div>
</template>
|
命名空间
我们可以添加 namespaced: true 的方式使其成为带命名空间的模块。
1
2
3
4
5
6
7
8
9
10
11
12
13
14
15
16
17
18
19
20
21
22
23
24
25
26
27
|
const userModule = {
namespaced: true,
state() {
return {
userCounter: 10
}
},
getters: {
doubleUserCounter(state, getters, rootState, rootGetters) {
console.log(getters, rootState, rootGetters);
return state.userCounter * 2
}
},
mutations: {
increment(state) {
state.userCounter++
}
},
actions: {
incrementAction(context) {
context.commit('increment')
}
},
}
export default userModule
|
1
2
3
4
5
6
7
8
9
10
11
12
13
14
15
16
17
18
19
20
21
22
23
24
| <template>
<div class="app">
<h2>counter:{{ $store.state.counter }}</h2>
<h2>userCounter:{{ $store.state.user.userCounter }}</h2>
<h2>systemCounter:{{ $store.state.system.systemCounter }}</h2>
<hr />
<button @click="userIncrement">user + 1</button>
<button @click="userIncrementAction">user + 1</button>
<h2>user getters:{{ $store.getters["user/doubleUserCounter"] }}</h2>
</div>
</template>
<script>
export default {
methods: {
userIncrement() {
this.$store.commit("user/increment");
},
userIncrementAction() {
this.$store.dispatch("user/incrementAction");
},
}
};
</script>
|
修改或派发根组件
如果我们想要在 actions 中修改 root 中的 state,有如下几种方式:
1
2
3
4
5
6
7
8
9
10
| actions: {
incrementAction(context) {
context.commit('increment')
context.commit('increment', null, { root: true })
context.dispatch('incrementAction', null, { root: true })
}
},
|
辅助函数
有如下三种写法:
- 第一种:
1
2
3
4
5
6
7
8
9
10
11
12
13
14
15
16
17
18
19
20
| import { mapState, mapGetters, mapMutations, mapActions } from "vuex";
export default {
computed: {
...mapState({
userCounter: (state) => state.user.userCounter,
}),
...mapGetters({
doubleUserCounter: "user/doubleUserCounter",
})
},
methods: {
...mapMutations({
increment: "user/increment",
}),
...mapActions({
incrementAction: "user/incrementAction",
})
}
};
|
- 第二种:
1
2
3
4
5
6
7
8
9
10
11
12
13
| import {
mapState, mapGetters, mapMutations, mapActions } from "vuex";
export default {
computed: {
...mapState("user", ["userCounter"]),
...mapGetters("user", ["doubleUserCounter"])
},
methods: {
...mapMutations("user", ["increment"]),
...mapActions("user", ["incrementAction"])
}
};
|
- 第三种:
1
2
3
4
5
6
7
8
9
10
11
12
13
| import { createNamespacedHelpers } from "vuex";
const { mapState, mapGetters, mapMutations, mapActions } = createNamespacedHelpers("user");
export default {
computed: {
...mapState(["userCounter"]),
...mapGetters(["doubleUserCounter"])
},
methods: {
...mapMutations(["increment"]),
...mapActions(["incrementAction"])
}
};
|
上面是在 Vue2 中的使用方法,下面我们来看看在 Vue3 中可以如何使用:
1
2
3
4
5
6
7
8
9
10
11
12
13
14
15
16
17
| import { mapState, mapGetters, mapMutations, mapActions } from "vuex";
export default {
setup() {
const state = mapState(["userCounter"]);
const getters = mapGetters(["doubleUserCounter"]);
const mutations = mapMutations(["increment"]);
const actions = mapActions(["incrementAction"]);
return {
...state,
...getters,
...mutations,
...actions,
};
},
};
|
如果我们像上面这样写,会发现 userCounter 和 doubleUserCounter 展示的是一个 function。这时我们可以使用到上面我们封装的 useState 和 useGetters 函数,但是上面所封装的没有命名空间这一概念,因此我们需要对它进行完善。
1
2
3
4
5
6
7
8
9
10
11
12
13
|
import { mapState, createNamespacedHelpers } from "vuex";
import { useMapper } from "./useMapper";
export function useState(moduleName, mapper) {
let mapperFn = mapState
if (typeof moduleName === 'string' && moduleName.length > 0) {
mapperFn = createNamespacedHelpers(moduleName).mapState
} else {
mapper = moduleName
}
return useMapper(mapper, mapperFn)
}
|
1
2
3
4
5
6
7
8
9
10
11
12
13
|
import { mapGetters, createNamespacedHelpers } from "vuex";
import { useMapper } from "./useMapper";
export function useGetters(moduleName, mapper) {
let mapperFn = mapGetters
if (typeof moduleName === 'string' && moduleName.length > 0) {
mapperFn = createNamespacedHelpers(moduleName).mapGetters
} else {
mapper = moduleName
}
return useMapper(mapper, mapperFn)
}
|
1
2
3
4
5
6
7
8
9
10
11
12
13
14
15
16
17
18
19
20
21
22
23
24
25
26
27
28
29
30
31
32
| <template>
<div class="app">
<h2>{{ userCounter }}</h2>
<h2>{{ doubleUserCounter }}</h2>
<hr />
<button @click="increment">user + 1</button>
<button @click="incrementAction">user + 1</button>
</div>
</template>
<script>
import { useState, useGetters } from "./hooks/index";
import { createNamespacedHelpers } from "vuex";
const { mapMutations, mapActions } = createNamespacedHelpers("user");
export default {
setup() {
const state = useState("user", ["userCounter"]);
const getters = useGetters("user", ["doubleUserCounter"]);
const mutations = mapMutations(["increment"]);
const actions = mapActions(["incrementAction"]);
return {
...state,
...getters,
...mutations,
...actions
};
},
};
</script>
|
TypeScript
TypeScript 是拥有类型的 JavaScript 超集,它可以编译成普通、干净、完整的 JavaScript 代码。
安装
TypeScript 最终会被编译成 JavaScript 来运行,因此我们需要搭建相应的环境。
安装:
1
| npm install typescript -g
|
版本查看:
基本使用
我们可以新建一个 index.ts 文件:
1
2
3
4
5
6
7
| let message: string = 'hello typescript'
function foo(payload: string) {
console.log(payload.length);
}
foo('123')
|
然后在控制台执行 tsc index.ts,我们就会发现生成了一个 index.js 文件。
这个文件就是被编译后的文件:
1
2
3
4
5
| var message = 'hello typescript';
function foo(payload) {
console.log(payload.length);
}
foo('123');
|
环境搭建
如果我们每次写了代码都要像上面那样去执行命令就会显得十分麻烦,下面我们就来使用两种环境搭建的方式:
- 使用
ts-node 方式搭建;
- 使用
webpack 方式搭建;
ts-node
安装:
1
2
| npm install ts-node -g
npm install tslib @types/node -g
|
使用:
执行后控制台就会打印输出信息。
webpack
创建一个文件夹 webpack-ts,并在里面新建 src 目录,并在里面再新建 main.ts 文件。
1
2
3
4
|
let message: string = 'hello typescript'
console.log(message);
|
在 webpack-ts 文件夹下执行:
1
2
| npm init
npm install webpack webpack-cli -D
|
再在根目录新建 webpack.config.js 文件。
1
2
3
4
5
6
7
8
9
10
|
const path = require("path")
module.exports = {
entry: "./src/main.ts",
output: {
path: path.resolve(__dirname, "./dist"),
filename: "bundle.js"
}
}
|
我们在 package.json 的 scripts 中新增一条:
然后我们在控制台执行 npm run build 后会发现控制台报错,是因为我们缺少 loader。
下面来安装一下:
1
| npm install ts-loader typescript -D
|
然后修改一下 webpack.config.js 文件:
1
2
3
4
5
6
7
8
9
10
11
12
13
14
15
16
17
18
19
20
| const path = require("path")
module.exports = {
entry: "./src/main.ts",
output: {
path: path.resolve(__dirname, "./dist"),
filename: "bundle.js"
},
resolve: {
extensions: [".ts"]
},
module: {
rules: [
{
test: /\.ts$/,
loader: 'ts-loader'
}
]
}
}
|
执行 npm run build 后报如下错误:
1
| error while parsing tsconfig.json
|
我们在控制台执行下面命令会自动生成 tsconfig.json 文件:
然后再执行 npm run build 即可。
我们可以在根目录创建 index.html 并引入 bundle.js 文件后即可在浏览器上看到效果。
下面我们开启本地服务并配置模板:
1
2
| npm install webpack-dev-server -D
npm install html-webpack-plugin -D
|
修改 webpack.config.js 文件:
1
2
3
4
5
6
7
8
9
10
11
12
13
14
15
16
17
18
19
20
21
22
23
24
25
26
27
28
| const path = require("path")
const HtmlWebpackPlugin = require("html-webpack-plugin")
module.exports = {
mode: "development",
entry: "./src/main.ts",
output: {
path: path.resolve(__dirname, "./dist"),
filename: "bundle.js"
},
devServer: {},
resolve: {
extensions: [".ts", ".js", ".cjs", ".json"]
},
module: {
rules: [
{
test: /\.ts$/,
loader: 'ts-loader'
}
]
},
plugins: [
new HtmlWebpackPlugin({
template: "./index.html"
})
]
}
|
给 package.json 文件的 scripts 添加:
1
| "serve": "webpack serve"
|
这时候我们可以把 index.html 文件引入的 bundle.js 文件给删除掉。
然后运行 npm run serve 即可。
变量的声明
在 TypeScript 中定义变量需要指定标识符的类型。
完整的声明格式如下:
声明了类型后 TypeScript 就会进行类型检测,声明的类型可以称之为类型注解;
1
| var / let / const 标识符: 数据类型 = 赋值;
|
1
2
3
4
5
| var name: string = 'lqzww'
let age: number = 18
const height: number = 2.99
export { }
|
注意:数据类型大小写是有区别的,就 string 来说:
- string:TypeScript 中的字符串类型;
- String:JavaScript 的字符串包装类的类型
JS与TS的数据类型
number
TS 与 JS 一样是不区分整数类型和浮点型的,统一为 number 类型。
TS 也支持二进制、八进制和十六进制的表示。
1
2
3
4
5
6
| let num1: number = 100
let num2: number = 0b100
let num3: number = 0o100
let num4: number = 0x100
console.log(num1, num2, num3, num4);
|
boolean
boolean 只有 true 和 false 两个值。
1
2
3
4
5
| let bool1: boolean = false
let bool2: boolean = true
bool2 = 10 > 20
console.log(bool1, bool2);
|
string
1
2
3
4
5
| let str1: string = '123'
let str2: string = "abc"
let str3 = `str1:${str1},str2:${str2}`
console.log(str1, str2, str3);
|
array
1
2
| let arr1: Array<string> = []
let arr2: string[] = []
|
object
1
2
3
4
| const obj: object = {
name: "lqzww",
age: 19
}
|
注意:我们不能从里面获取数据,也不能设置数据。
null与undefined
1
2
| let n: null = null
let u: undefined = undefined
|
symbol
在 ES5 中我们不可以在对象中添加相同的属性名称,例如:
1
2
3
4
| const obj = {
name: 'lq',
name: 'zww'
}
|
我们可以利用 symbol 来定义相同的名称,这是因为 symbol 函数返回的是不同的值,例如:
1
2
3
4
5
6
7
| const name1: symbol = Symbol('name')
const name2: symbol = Symbol('name')
const obj = {
[name1]: 'lq',
[name2]: 'zww'
}
|
any
在某些情况下,我们无法确定一个变量的类型,这个时候可以使用 any 类型。
1
2
3
4
5
6
7
| let message: any = 'abc'
message = 123
message = [1, 2, 3]
message = false
message = null
message = undefined
message = {}
|
unknown
unknown 是 TypeScript 中比较特殊的一种类型,它用于描述类型不确定的变量。
1
2
3
4
5
6
7
8
9
10
11
12
13
14
15
16
17
18
19
| function a() {
return 123
}
function b() {
return 'abc'
}
let flag = true
let result: unknown
if (flag) {
result = a()
} else {
result = b()
}
let message: string = result
let number: number = result
|
注意:
- unknown 类型只能赋值给 any 和 unknown 类型;
- any 类型可以赋值给任意类型。
void
void 通常用来指定一个函数是没有返回值的,那么它的返回值就是 void 类型。
1
2
3
| function sum(num1: number, num2: number): void {
console.log(num1 + num2);
}
|
never
never 表示永远不会发生值的类型。
比如一个函数是死循环或者抛出异常。
1
2
3
4
5
6
7
8
9
10
11
12
13
14
15
16
17
18
19
20
21
22
| function a(): never {
while (true) {
}
}
function b(): never {
throw new Error()
}
function c(message: number | string) {
switch (typeof message) {
case 'number':
console.log('number');
break
case 'string':
console.log('string');
break
default:
const check: never = message
}
}
|
tuple
它是元组类型。
1
| let info: [string, number] = ['lqzww', 18]
|
tuple 与数组的区别:
- 数组中通常存放相同类型的元素,不同类型的元素是不推荐放在数组中的;
- 元组中每个元素都有自己的类型,可以根据索引值获取到值可以确定对应的类型。
函数的参数和返回值类型
TypeScript 允许我们指定函数的参数和返回值类型。
1
2
3
| function sum(num1: number, num2: number): number {
return num1 + num2
}
|
等价于:
1
2
3
| function sum(num1: number, num2: number) {
return num1 + num2
}
|
通常情况下,不需要返回类型注解,因为 TS 会根据 return 返回值自动推导返回值类型。
匿名函数的参数
1
2
3
4
| let arr = ['a', 'b', 'c']
arr.forEach(item => {
})
|
item 会根据上下文环境推导出来,这个时候可以不添加类型注解。
对象类型
1
2
3
4
5
6
| function printPoint(point: { x: number, y: number }) {
console.log(point.x);
console.log(point.y);
}
printPoint({ x: 10, y: 100 })
|
可选类型
1
2
3
4
5
6
7
8
| function printPoint(point: { x: number, y: number, z?: number }) {
console.log(point.x);
console.log(point.y);
console.log(point.z);
}
printPoint({ x: 10, y: 100 })
printPoint({ x: 10, y: 100, z: 1000 })
|
注意:可选类型必须写在必选类型后面。
联合类型
TypeScript 的类型系统允许我们使用多种运算符,从现有类型中构建新类型。
- 联合类型是由两个或者多个其他类型组成的类型;
- 表示可以是这些类型中的任何一个值;
- 联合类型中的每一个类型被称之为联合成员。
1
2
3
4
5
6
| function print(id: number | string) {
console.log(id);
}
print(123)
print('123')
|
类型别名
我们可以使用 type 来定义类型别名。
1
2
3
4
5
6
7
8
9
| type idType = string | number | boolean
type objType = {
x: number,
y: number,
z?: number
}
function print(id: idType) { }
function printPoint(point: objType) { }
|
类型断言 - as
有时候 TS 无法获取具体的类型信息,这个时候需要使用类型断言。
比如我们通过 document.getElementById,TS 只知道该函数会返回 HTMLElement,但并不知道它具体的类型:
1
2
| let el = document.getElementById('img') as HTMLImageElement
el.src = 'http://....'
|
1
| let name = ('lqzww' as unknown) as number
|
非空类型断言 - !
我们先看下面代码:
1
2
3
4
5
| function printMessage(message?: string) {
console.log(message.length);
}
printMessage('123')
|
当我们进行编译后,会发现编译不通过。因为传入的可能为 undefined。
但是,如果我们确定传入的参数是有值的,这个时候可以使用非空类型断言。
它用 ! 来表示可以确定某个标识符是有值的,跳过 TS 在编译阶段对它的检测。
1
2
3
4
5
6
| function printMessage(message?: string) {
console.log(message!.length);
}
printMessage('123')
printMessage('abc')
|
!! 和 ??
!! 操作符:将其他类型转换成 boolean 类型。
1
2
3
| let message = 'hello'
let flag = !!message
console.log(flag);
|
?? 操作符:即空值合并操作符,是一个逻辑操作符。当操作符左侧为 null 或 undefined 时,返回右侧操作数,否则返回左侧操作数。
1
2
3
| let message: string | null = null
let content = message ?? 'default'
console.log(content);
|
字面量类型
1
2
3
| let message: 'hello' = 'hello'
let num: 123 = 123
num = 1
|
像上面这种就是字面量类型,字面量类型必须是等于它的值的。
默认情况下这种使用是没有任何意义的,一般情况下会将多个类型联合一起使用:
1
2
3
4
| type Align = 'left' | 'right' | 'center'
let align: Align = 'left'
align = 'right'
align = 'center'
|
类型缩小
typeof
1
2
3
4
5
6
7
8
| type IdType = number | string
function printId(id: IdType) {
if (typeof id === 'string') {
} else {
}
}
|
平等的类型缩小(===、==、!=、!===、switch)
1
2
3
4
5
6
7
8
9
10
11
12
13
14
15
16
17
18
19
20
21
22
23
24
| type Position = 'left' | 'right' | 'top' | 'bottom'
function printPosition(position: Position) {
if (position === 'left') {
console.log(position);
}
if (position == 'left') {
console.log(position);
}
if (position !== 'left') {
console.log(position);
}
if (position != 'left') {
console.log(position);
}
switch (position) {
case 'left':
console.log(position);
break;
}
}
|
instanceof
1
2
3
4
5
| function printTime(time: string | Date) {
if (time instanceof Date) {
console.log(time);
}
}
|
in
1
2
3
4
5
6
7
8
9
10
11
12
13
14
15
16
17
18
19
20
21
22
23
| type Fish = {
swimming: () => void
}
type Dog = {
running: () => void
}
function walk(animal: Fish | Dog) {
if ('swimming' in animal) {
animal.swimming()
} else {
animal.running()
}
}
const fish: Fish = {
swimming() {
console.log('swimming');
}
}
walk(fish)
|
函数类型
1
2
3
4
5
6
7
8
| function foo() { }
type FooType = () => void
function bar(fn: FooType) {
fn()
}
bar(foo)
|
定义常量时的函数类型:
1
2
3
4
| type AddType = (num1: number, num2: number) => number
const add: AddType = (a1: number, a2: number) => {
return a1 + a2
}
|
1
2
3
4
5
6
7
8
9
10
11
12
13
| function calc(n1: number, n2: number, fn: (num1: number, num2: number) => number) {
return fn(n1, n2)
}
const result1 = calc(10, 20, function (a1, a2) {
return a1 + a2
})
console.log(result1);
const result2 = calc(20, 30, function (a1, a2) {
return a1 * a2
})
console.log(result2);
|
函数重载
函数重载:函数的名称相同,但参数不同的几个函数,就是函数重载。
1
2
3
4
5
6
7
8
9
| function add(num1: number, num2: number): number;
function add(num1: string, num2: string): string;
function add(num1: any, num2: any): any {
return num1 + num2
}
add(10, 20)
add('10', '20')
|
在函数重载中,实现的函数是不能直接被调用的。
交叉类型
交叉类型表示需要满足多个类型的条件,使用 & 符号。
1
2
3
4
5
6
7
8
9
10
11
12
13
14
15
16
17
18
19
20
21
22
23
24
25
26
27
28
29
30
31
32
33
|
type WhyType = number | string
type Direction = "left" | "right" | "center"
type WType = number & string
interface ISwim {
swimming: () => void
}
interface IFly {
flying: () => void
}
type MyType1 = ISwim | IFly
type MyType2 = ISwim & IFly
const obj1: MyType1 = {
flying() {
}
}
const obj2: MyType2 = {
swimming() {
},
flying() {
}
}
|
类
TS 作为 JS 的超集,也是支持 class 关键字的使用的,并且还可以对类的属性和方法等进行静态类型检测。
基本使用
1
2
3
4
5
6
7
8
9
10
11
12
13
14
15
16
17
| class Person {
name: string
age: number
constructor(name: string, age: number) {
this.name = name
this.age = age
}
print() {
console.log(this.name, this.age);
}
}
let p = new Person('lqzww', 18)
console.log(p.name);
console.log(p.age);
|
类的继承
1
2
3
4
5
6
7
8
9
10
11
12
13
14
15
16
17
18
19
20
21
22
23
24
25
26
27
28
29
30
| class Person {
name: string
age: number
constructor(name: string, age: number) {
this.name = name
this.age = age
}
eating() {
console.log('eating');
}
}
class Student extends Person {
num: number
constructor(name: string, age: number, num: number) {
super(name, age)
this.num = num
}
studying() {
super.eating()
console.log('studying');
}
}
let s = new Student('lqzww', 18, 100)
s.studying()
|
类的成员修饰符
在 TS 中,类的属性和方法支持以下三种修饰符:
- public:在任何地方可见、公有的属性或方法,默认编写的属性就是它;
- private:仅在同一类中可见、私有的属性或方法;
- protected:仅在类自身及子类中可见、受保护的属性或方法;
1
2
3
4
5
6
7
8
9
10
11
12
13
14
15
| class Person {
private name: string = 'lqzww'
getName() {
return this.name
}
setName(newName: string) {
this.name = newName
}
}
let p = new Person()
p.setName('hhhh')
console.log(p.getName());
|
1
2
3
4
5
6
7
8
9
10
11
12
| class Person {
protected name: string = 'lqzww'
}
class Student extends Person {
getName() {
return this.name
}
}
let s = new Student()
console.log(s.getName());
|
只读属性readonly
- 只读属性是可以在构造器中赋值,赋值之后不可修改;
- 属性本身是不能修改的,但是如果它是对象类型,对象中的属性是可以修改的。
1
2
3
4
5
6
7
8
9
10
11
12
13
14
15
16
17
18
| class Person {
readonly name: string
age?: number
readonly friend?: Person
constructor(name: string, friend?: Person) {
this.name = name
this.friend = friend
}
}
let p = new Person('lqzww', new Person('hhhh'))
console.log(p.name);
console.log(p.friend);
if (p.friend) {
p.friend.age = 18
}
|
getters/setters
1
2
3
4
5
6
7
8
9
10
11
12
13
14
15
16
17
| class Person {
private _name: string
constructor(name: string) {
this._name = name
}
set name(newName) {
this._name = newName
}
get name() {
return this._name
}
}
let p = new Person('lq')
p.name = 'lqzww'
console.log(p.name);
|
类的静态成员
类的静态成员可以直接访问,而不需要去 new 一下来访问。
1
2
3
4
5
6
7
8
9
10
| class StaticPerson {
static time: string = '10:00'
static liking() {
console.log('liking');
}
}
console.log(StaticPerson.time);
StaticPerson.liking()
|
类的类型
类本身也是可以作为数据类型。
1
2
3
4
5
6
7
8
9
10
11
12
13
14
15
16
17
18
| class Person {
name: string = 'lqzww'
liking() { }
}
let p = new Person()
let p1: Person = {
name: 'hhh',
liking() { }
}
function print(p: Person) {
console.log(p.name);
}
print(new Person())
print({ name: 'hhh', liking: () => { } })
|
接口
声明对象类型
1
2
3
4
5
6
7
8
9
10
11
12
13
14
15
16
17
18
19
20
|
interface InfoType {
readonly name: string,
age: number,
friend?: {
name: string
}
}
const info: InfoType = {
name: "lqzww",
age: 18,
friend: {
name: "hhh"
}
}
console.log(info.name);
console.log(info.friend?.name);
|
索引类型
我们可以通过 interface 来定义索引类型。
1
2
3
4
5
6
7
8
9
10
11
12
13
14
15
16
17
18
| interface TypeLike {
[index: number]: string
}
const likes: TypeLike = {
0: 'tlbb',
1: 'wzry',
2: 'blct'
}
interface TypeTime {
[name: string]: number
}
const times: TypeTime = {
'yw': 1,
'sx': 11,
'yy': 333
}
|
函数类型
interface 还可以用来定义函数类型。
1
2
3
4
5
6
7
8
9
10
11
12
13
14
15
|
interface CalcFn {
(n1: number, n2: number): number
}
function calc(num1: number, num2: number, calcFn: CalcFn) {
return calcFn(num1, num2)
}
const add: CalcFn = (num1, num2) => {
return num1 + num2
}
calc(10, 20, add)
|
一般情况下,还是推荐使用类型别名来定义函数。
接口继承
它与类一样都是通过使用 extends 关键字来进行继承。并且,接口是支持多继承的,而类是不支持的。
1
2
3
4
5
6
7
8
9
10
11
12
13
14
15
16
17
| interface ISwim {
swimming: () => void
}
interface IFly {
flying: () => void
}
interface IAction extends ISwim, IFly {
}
const action: IAction = {
swimming() { },
flying() { }
}
|
interface与type区别
interface 和 type 都可以用来定义对象类型。
- 如果定义非对象类型,通常使用type;
- 如果定义对象类型,那么它们是有区别的:
interface 可以重复的对某个接口来定义属性和方法;type 定义的是别名,别名是不能重复的;
枚举类型
1
2
3
4
5
6
7
8
9
10
11
12
13
14
15
16
17
18
19
20
21
22
23
24
25
26
27
28
29
30
31
| enum Direction {
LEFT,
RIGHT,
TOP,
BOTTOM
}
function turnDirection(direction: Direction) {
switch (direction) {
case Direction.LEFT:
console.log('左');
break;
case Direction.RIGHT:
console.log('右');
break;
case Direction.TOP:
console.log('上');
break;
case Direction.BOTTOM:
console.log('下');
break;
default:
const foo: never = direction
break;
}
}
turnDirection(Direction.LEFT)
turnDirection(Direction.RIGHT)
turnDirection(Direction.TOP)
turnDirection(Direction.BOTTOM)
|
泛型
泛型就是将类型进行参数化,在外界调用的时候决定是什么类型。
使用
1
2
3
4
5
6
7
8
9
10
11
12
13
|
function sum<T>(num: T): T {
return num
}
sum<number>(1)
sum<{ name: string }>({ name: 'lqzww' })
sum<any[]>(['abc'])
sum(10)
sum('10')
|
传入多个类型
1
2
3
4
5
| function foo<T, E, O>(arg1: T, arg2: E, arg3: O) {
}
foo<number, string, boolean>(123, '123', true)
|
泛型接口
1
2
3
4
5
6
7
8
9
| interface Person<T1, T2> {
name: T1
age: T2
}
let p: Person<string,number> = {
name: 'lqzww',
age: 18
}
|
1
2
3
4
5
6
7
8
9
| interface Person<T1 = string, T2 = number> {
name: T1
age: T2
}
let p: Person = {
name: 'lqzww',
age: 18
}
|
泛型类
1
2
3
4
5
6
7
8
9
10
11
12
13
| class Point<T>{
x: T
y: T
constructor(x: T, y: T) {
this.x = x
this.y = y
}
}
let p1 = new Point('1.2', '2.3')
let p2 = new Point<string>('1.2', '2.3')
let p3: Point<string> = new Point('1.2', '2.3')
|
类型约束
1
2
3
4
5
6
7
8
9
10
11
| interface Length {
length: number
}
function getLength<T extends Length>(arg: T) {
return arguments.length
}
getLength('123')
getLength([1, 2, 3])
getLength({ length: 10 })
|
命名空间namespace
下面我们在之前 webpack 搭建的环境来编写。
我们新建 src -> utils -> format.ts 文件。
1
2
3
4
5
6
7
8
9
10
11
12
|
export namespace time {
export function format(time: string) {
return '2022-01-01'
}
}
export namespace price {
export function format(price: number) {
return '2.22'
}
}
|
然后在 main.ts 中使用:
1
2
3
4
| import { time, price } from './utils/format'
time.format('2022-01-01')
price.format(2.22)
|
类型查找
在 TypeScript 中,有一种后缀为 .d.ts 文件,它是用来做类型的声明(declare)。它仅仅用来做类型检测,告知 TS 有哪些类型。
TS 会在下面这三种来查找我们的类型声明:
- 内置类型声明;
- 外部定义类型声明;
- 自定义类型声明;
内置类型声明
它是 TS 所自带的,帮助我们内置了 JavaScript 运行时的一些标准化 API 的声明文件。
比如 Math、Date、DOM API 这些内置类型。
这些内置类型声明通常在我们安装 TS 的环境中就会有。
https://github.com/microsoft/TypeScript/tree/main/lib
外部定义类型声明
它通常是我们使用了一些第三方库,需要的一些类型声明。
而这些第三方库通常有两种类型声明方式:
- 在自己库中就进行类型声明(编写
.d.ts 文件),比如 axios;
- 通过社区的一个公有库
DefinitelyTyped 存放类型声明文件。我们可以通过这个地址查找声明安装方式:https://www.typescriptlang.org/dt/search
自定义类型声明
在下面这两种情况下我们需要自己来定义声明文件:
- 使用的第三方库是一个纯的 JavaScript 库,没有对应的声明文件,比如 lodash;
- 给自己的代码中声明一些类型,方便在其他地方直接进行使用;
我们可以在 src 目录下新建 lqzww.dt.ts 文件,然后在该文件下进行声明。
1
2
3
4
5
6
7
8
9
10
11
12
13
14
15
16
17
18
19
20
21
22
23
24
|
declare let zName: string
declare let zAge: number
declare function zFoo(): void
// 3. 声明类
declare class Person {
name: string
age: number
constructor(name: string, age: number)
}
// 4. 声明模块
declare module 'lodash' {
export function join(args: any[]): any
}
// 5. 声明文件
declare module '*.jpg'
declare module '*.png'
|
声明好后我们可以在 index.html 中定义:
1
2
3
4
5
6
7
8
9
10
11
12
13
14
15
16
17
18
19
20
21
22
23
24
25
26
27
| <!DOCTYPE html>
<html lang="en">
<head>
<meta charset="UTF-8">
<meta http-equiv="X-UA-Compatible" content="IE=edge">
<meta name="viewport" content="width=device-width, initial-scale=1.0">
<title>Document</title>
</head>
<body>
<script>
let zName = 'lqzww'
let zAge = 18
function zFoo() {
console.log('zfoo');
}
function Person(name, age) {
this.name = name
this.age = age
}
</script>
</body>
</html>
|
下面我们就可以在 main.ts 中来获取使用:
1
2
3
4
5
6
7
| console.log(zName);
console.log(zAge);
zFoo()
let p = new Person('lqzww', 18)
console.log(p);
|
1
2
3
4
5
6
7
8
9
10
11
12
13
14
15
16
17
18
19
20
21
22
23
24
25
26
27
28
29
30
31
32
33
34
35
36
37
38
39
40
41
42
43
44
| {
"compilerOptions": {
"target": "esnext",
"module": "esnext",
"strict": true,
"jsx": "preserve",
"moduleResolution": "node",
"skipLibCheck": true,
"esModuleInterop": true,
"allowSyntheticDefaultImports": true,
"forceConsistentCasingInFileNames": true,
"useDefineForClassFields": true,
"sourceMap": true,
"baseUrl": ".",
"types": ["webpack-env"],
"paths": {
"@/*": ["src/*"]
},
"lib": ["esnext", "dom", "dom.iterable", "scripthost"]
},
"include": [
"src/**/*.ts",
"src/**/*.tsx",
"src/**/*.vue",
"tests/**/*.ts",
"tests/**/*.tsx"
],
"exclude": ["node_modules"]
}
|
后台管理系统
项目搭建
创建项目
输入上面命令后,选择 Babel、TypeScript、Router、Vuex、CSS Pre-processors、Linter / Formatter。
1
2
| cd vue3-ts-cms
npm run serve
|
代码规范
editorconfig配置
.editorConfig 文件有助于为不同的 IDE 编辑器上处理同一项目的多个开发人员维护统一的编码风格。
在项目根目录创建 .editorConfig 文件:
1
2
3
4
5
6
7
8
9
10
11
12
13
14
15
| # http://editorconfig.org
root = true
[*] # 表示所有文件适用
charset = utf-8 # 设置文件字符集为 utf-8
indent_style = space # 缩进风格(tab | space)
indent_size = 2 # 缩进大小
end_of_line = lf # 控制换行类型(lf | cr | crlf)
trim_trailing_whitespace = true # 去除行首的任意空白字符
insert_final_newline = true # 始终在文件末尾插入一个新行
[*.md] # 表示仅 md 文件适用以下规则
max_line_length = off
trim_trailing_whitespace = false
|
注意:在 VSCode 中需要安装一个插件才能生效:EditorConfig for VS Code。
prettier配置
Prettier 是一款强大的代码格式化工具,支持 JavaScript、TypeScript、CSS、SCSS、Less、JSX、Angular、Vue、GraphQL、JSON、Markdown 等语言,基本上前端能用到的文件格式它都可以搞定,是当下最流行的代码格式化工具。
安装:
然后在项目根目录创建 .prettierrc 文件:
1
2
3
4
5
6
7
8
| {
"useTabs": false,
"tabWidth": 2,
"printWidth": 80,
"singleQuote": true,
"trailingComma": "none",
"semi": false
}
|
- useTabs:使用 tab 缩进还是空格缩进,true:tab 缩进,false:空格缩进;
- tabWidth:tab 是空格的情况下,是几个空格;
- printWidth:当行字符的长度,推荐 80,也有人喜欢 100 或者 120;
- singleQuote:使用单引号还是双引号,true:使用单引号,false:使用双引号;
- trailingComma:在多行输入的尾逗号是否添加,
none:不添加;
- semi:语句末尾是否要加分号,默认值 true,选择 false 表示不加;
我们再在项目根目录创建 .prettierignore 文件,它表示忽略文件:
1
2
3
4
5
6
7
8
9
| /dist/*
.local
.output.js
/node_modules/**
**/*.svg
**/*.sh
/public/*
|
我们可以在 package.json 文件中配置 scripts,直接执行命令让所有文件都格式化下:
1
| "prettier": "prettier --write ."
|
我们还可以安装 prettier 的 VSCode 插件:Prettier - Code formatter
ESLint配置
在 VSCode 中我们可以安装 ESLint 插件:ESLint
在创建项目时,我们选择了 ESLint + prettier。
如果你的 ESLint 与 prettier 存在冲突,可安如下解决:
1
2
| # 创建项目时如果选择了 prettier,这两个插件会自动安装
npm install eslint-plugin-prettier eslint-config-prettier -D
|
在 .eslintrc.js 的 extends 数组末尾添加插件:
1
| 'plugin:prettier/recommended'
|
最后重启编辑器即可解决。
Husky的使用
虽然已经要求项目使用 eslint,但是不能保证提交代码之前都将 eslint 中的问题解决掉了。
我们希望保证代码仓库中的代码都是符合 eslint 规范的。那么我们需要在执行 git commit 的时候对其进行校验,如果不符合 eslint 规范,那么自动通过规范进行修复。
我们可以利用 Husky 工具来解决。
husky 是一个 git hook 工具,可以帮助我们触发 git 提交的各个阶段:pre-commit、commit-msg、pre-push。
下面我们就来安装使用,这里我们使用自动配置命令:
1
| npx husky-init && npm install
|
这个命令会做三件事:
- 安装 husky 相关依赖;
- 根目录创建
.husky 文件夹;
- 在
package.json 中添加脚本:"prepare": "husky install";
下面我们就去修改下 .husky -> pre-commit 配置文件:
1
2
3
4
| #!/usr/bin/env sh
. "$(dirname -- "$0")/_/husky.sh"
npm run lint
|
最后在执行 git commit 的时候,会执行 npm run lint 脚本。
commitizen的使用
通常 git commit 会按照统一的风格来提交,这样可以快速定位每次提交的内容,方便之后对版本进行控制。
但是如果每次手动来编写这些是比较麻烦的事情,我们可以使用一个工具:Commitizen。它是一个帮助我们编写规范 commit message 的工具。
安装:
1
| npm install commitizen -D
|
安装 cz-conventional-changelog,并且初始化 cz-conventional-changelog:
1
| npx commitizen init cz-conventional-changelog --save-dev --save-exact
|
它会帮助我们安装 cz-conventional-changelog 依赖,并在 package.json 文件中进行配置:
1
2
3
4
5
| "config": {
"commitizen": {
"path": "./node_modules/cz-conventional-changelog"
}
}
|
这个时候我们可以执行 npx cz 进行代码提交:
- 选择本次更新类型
1
| Select the type of change that you're committing:
|
| type |
作用 |
| feat |
新增特性 (feature) |
| fix |
修复Bug(bug fix) |
| docs |
修改文档(documentation) |
| style |
代码格式修改(white-space, formatting, missing semi colons, etc) |
| refactor |
代码重构(refactor) |
| perf |
改善性能(A code change that improves performance) |
| test |
测试(when adding missing tests) |
| build |
变更项目构建或外部依赖(例如 scopes: webpack、gulp、npm 等) |
| ci |
更改持续集成软件的配置文件和 package 中的 scripts 命令,例如 scopes: Travis, Circle 等 |
| chore |
变更构建流程或辅助工具(比如更改测试环境) |
| revert |
代码回退 |
本次修改的范围(作用域)
1
| What is the scope of this change (e.g. component or file name): (press enter to skip)
|
输入提交的信息
1
| Write a short, imperative tense description of the change (max 88 chars):
|
提交详细的描述信息
1
| Provide a longer description of the change: (press enter to skip)
|
是否是一次重大的更改,默认 N
1
| Are there any breaking changes? (y/N)
|
是否影响某个open issue,默认 N
1
| Does this change affect any open issues? (y/N)
|
完成以上就完成了代码的提交了。
我们可以在 package.json 的 scripts 中添加命令:
虽然上面按照 cz 来规范了提交风格,但是依然可以通过 git commit 按照不规范的格式来提交代码。因此,我们可以通过 commitlint 来限制提交。
安装 @commitlint/config-conventional 和 @commitlint/cli:
1
| npm i @commitlint/config-conventional @commitlint/cli -D
|
在项目根目录创建 commitlint.config.js文件:
1
2
3
| module.exports = {
extends: ['@commitlint/config-conventional']
}
|
下面使用 husky 来生成 commit-msg 文件,验证提交信息:
1
| npx husky add .husky/commit-msg "npx --no-install commitlint --edit $1"
|
执行完上面这个命令后,我们会在 .husky 文件夹下生成了 commit-msg 文件:
1
2
3
4
| #!/usr/bin/env sh
. "$(dirname -- "$0")/_/husky.sh"
npx --no-install commitlint --edit
|
下面我们执行 git commit 时就会阻止提交信息了。
element-plus集成
安装:
1
| npm install element-plus --save
|
全局引用
1
2
3
4
5
6
7
8
9
|
import { createApp } from 'vue'
import App from './App.vue'
import router from './router'
import store from './store'
import ElementPlus from 'element-plus'
import 'element-plus/dist/index.css'
createApp(App).use(router).use(store).use(ElementPlus).mount('#app')
|
局部引用
自动导入
安装:
1
| npm install -D unplugin-vue-components unplugin-auto-import
|
在 vue.config.js 中配置:
1
2
3
4
5
6
7
8
9
10
11
12
13
14
15
16
17
18
19
| const { defineConfig } = require('@vue/cli-service')
const AutoImport = require('unplugin-auto-import/webpack')
const Components = require('unplugin-vue-components/webpack')
const { ElementPlusResolver } = require('unplugin-vue-components/resolvers')
module.exports = defineConfig({
transpileDependencies: true,
configureWebpack: {
plugins: [
AutoImport({
resolvers: [ElementPlusResolver()]
}),
Components({
resolvers: [ElementPlusResolver()]
})
]
}
})
|
自动导入图标集
上面我们已经安装过 unplugin-auto-import 依赖,这里我们只需要安装 unplugin-icons:
然后在 vue.config.js 中配置:
1
2
3
4
5
6
7
8
9
10
11
12
13
14
15
16
17
18
19
20
21
22
23
24
25
26
27
28
29
30
31
32
33
34
35
36
37
38
39
| const { defineConfig } = require('@vue/cli-service')
const AutoImport = require('unplugin-auto-import/webpack')
const Components = require('unplugin-vue-components/webpack')
const { ElementPlusResolver } = require('unplugin-vue-components/resolvers')
module.exports = defineConfig({
transpileDependencies: true,
configureWebpack: {
plugins: [
AutoImport({
imports: ['vue'],
resolvers: [
ElementPlusResolver(),
require('unplugin-icons/resolver')({
prefix: 'i'
})
]
}),
Components({
resolvers: [
require('unplugin-icons/resolver')({
enabledCollections: ['ep']
}),
ElementPlusResolver()
]
}),
require('unplugin-icons/webpack')({
autoInstall: true
})
]
}
})
|
这里我们只注册了 ep,我们可以直接在 这里 查找想要的图标。
使用:
1
2
| <i-ep-add-location />
<IEpAddLocation />
|
它可以重置不同浏览器的默认样式。
安装:
1
| npm install normalize.css
|
在 main.ts 中引用:
Echarts
可视化工具
认识
一个基于 JavaScript 的开源可视化图表库。
Echarts 的历史:
- 它是由百度团队开源;
- 2018年处,捐赠给 Apache 基金会,成为 ASF(Apache Software Foundation)孵化级项目;
- 2021年1月26日晚,Apache 基金会官方宣布 ECharts 项目正式毕业,成为 Apache 顶级项目;
- 2021年1月28日,ECharts5 线上发布会举行;
它有如下特点:
- 丰富的图表类型:提供开箱即用的 20 多种图表和十几种组件,并且支持各种图表以及组件的任意组合;
- 强劲的渲染引擎:Canvas、SVG 双引擎一键切换,增量渲染、流加载等技术实现千万级数据的流畅交互;
- 专业的数据分析:通过数据集管理数据,支持数据过滤、聚类、回归,帮助实现同一份数据的多维度分析;
- 优雅的可视化设计:默认设计遵从可视化原则,支持响应式设计,并且提供了灵活的配置项方便开发者定制;
- 健康的开源社区:活跃的社区用户保证了项目的健康发展,也贡献了丰富的第三方插件满足不同场景的需求;
- 友好的无障碍访问:智能生成的图表描述和贴花图案,帮助视力障碍人士了解图表内容,读懂图表背后的故事;
使用
- 获取 ECharts:
- 引入 ECharts:通过不同的方式进行引入:
import * as echarts from 'echarts';
- 初始化 ECharts 对象并配置:
1
2
3
4
5
6
7
8
9
10
11
12
13
14
15
16
17
18
19
20
21
22
23
24
25
26
27
28
29
30
31
32
33
34
35
36
37
38
39
40
41
| <template>
<div class="dashboard">
<div ref="divRef" :style="{ width: '600px', height: '500px' }"></div>
</div>
</template>
<script lang="ts">
import { defineComponent, ref, onMounted } from 'vue'
import * as echarts from 'echarts'
export default defineComponent({
name: 'dashboard',
setup() {
const divRef = ref<HTMLElement>()
onMounted(() => {
const echartInstance = echarts.init(divRef.value!)
const option = {
title: {
text: 'ECharts 入门示例'
},
tooltip: {},
xAxis: {
data: ['衬衫', '羊毛衫', '雪纺衫', '裤子', '高跟鞋', '袜子']
},
yAxis: {},
series: [
{
name: '销量',
type: 'bar',
data: [5, 20, 36, 10, 10, 20]
}
]
}
echartInstance.setOption(option)
})
return { divRef }
}
})
</script>
|
canvas vs svg
通常在渲染图表时我们会选择 svg 或者 canvas 进行渲染。这两种渲染模式是比较相近的,并且可以相互替换的。
ECharts 最初采用的是 canvas 绘制图表,从 ECharts4.x 开始,发布了 svg 渲染器。
- canvas 更适合绘制图形元素数量非常大的图表(如热力图、地理坐标系或平行坐标系上的大规模线图或散点图等),也利于实现某些视觉特效;
- 在不少场景中,svg 具有重要的优势。它的内存占用更低、渲染性能略高、并且用户使用浏览器内置的缩放功能时不会模糊;
 微信
微信 支付宝
支付宝 QQ
QQ%20NavigationDuplicated%20Avoided%20redundant%20navigation%20to%20current%20location%E7%9A%84%E9%97%AE%E9%A2%98/bug.jpg)